Documentation Contributor Guide
This section describes the guidelines for contributing to the StarlingX documentation.
Quickstart
The StarlingX documentation uses reStructuredText (RST) markup syntax with Sphinx extensions. It uses the same contribution setup and workflow as the OpenStack documentation.
Note
The supported version of tox is currently pinned at 2.9.1. If possible, using this version is recommended for local builds.
Setup for contribution
Follow the OpenStack instructions for setting up for contribution.
Make a change
Make changes following the OpenStack instructions for:
-
Note
StarlingX requires the use of a Signed-off-by header. Use the -s option with git commit.
When writing documentation, follow Writing style and RST conventions.
Build the documentation locally to verify your changes before committing. Follow the OpenStack instructions for Building documentation.
If needed, follow up with edits to your patch following the OpenStack instructions for Responding to requests.
It can sometimes be useful to search the output globally for a string that may not be reliably returned by the built-in search functionality. For example, you may need to find and update all instances of a version number or container name.
You can generate HTML output to a single page and use your browser’s search functionality to search globally.
To build all documentation as a single page, run the following command from your local clone of the documentation repository:
$ tox -e singledoc
The output will be available in <repo-root>/doc/build/singlepage
Note
The quality checks done at the end of the build scan the most recent output
from running tox -e docs and do not reflect any errors or
corrections in singledoc output.
Find tasks and help needed
If you are looking for work to complete:
Refer to the StarlingX documentation StoryBoard for topics that need content. Many topics have stub pages in the documentation with a link to the associated story.
Find open documentation bugs on Launchpad.
If you make a contribution that has an the associated story, task, or bug in the comment, link to the related story or bug as described in the Code Submission Guidelines.
Docs organization
Documentation for StarlingX is organized into the following sections:
- Introduction
Overview of the StarlingX project.
- Deployment Configurations
Supported deployment configuration options.
- Planning
Requirements planning guidance.
- Installation
Release-specific installation and deployment guides.
- Security
Detailed discussion of security configuration.
- System Configuration
Detailed discussion of various post-installation configuration changes.
- Data Networks
Discussion of StarlingX data network configuration and management.
- Node Management
Discussion of StarlingX node configuration and management.
- Backup and Restore
Discussion of StarlingX backup and restore procedures.
- Updates and Upgrades
Discussion of StarlingX update and upgrade procedures.
- KubeVirt
Overview of VM support using KubeVirt.
- Admin Tasks
Overview of common administrator tasks.
- User Tasks
Overview of common user tasks.
- Guest Integration
Overview of various guest integrations.
- Distributed Cloud
Discussion of StarlingX Distributed Cloud for edge computing.
- Configuration
Configuration references for post-installation StarlingX system configuration.
- Operation Guides
System administration and maintenance guides.
- REST API Reference
REST API references for the StarlingX project. For additional information about where REST API documentation is located, see API documentation.
- CLI Reference
Reference for the StarlingX project command line interface (CLI).
- Developer Resources
Resources for developers using or building StarlingX.
- Release Notes
Release notes for all StarlingX releases.
- Contributor Guides
Overview and guidelines for contributing to StarlingX documentation.
API documentation
The structure and location of the REST API documentation deserves extra explanation.
Most REST API content is generated from the StarlingX project associated with the API. For example, the documentation for the StarlingX metal REST API is generated from the metal repository.
API references for StarlingX extensions are part of the docs repository, located
in the api-ref project:
StarlingX extensions to the OpenStack Block Storage API
StarlingX extensions to the OpenStack Compute API
StarlingX extensions to the OpenStack Image API
StarlingX extensions to the OpenStack Networking API
The api-ref project also contains index pages used by Sphinx to
generate the final content tree. Note that the REST API landing page used to
render content in the generated website is found in the doc project.
For additional information on the API documentation, refer to API Documentation Contributor Guide.
Spec documentation
Spec documentation is found in the Starlingx specs project.
The specs/2019.03 directory contains the documentation files for approved
and implemented specs.
Document structure
Index rules
Each document consists of one main Sphinx index file, with two optional ones for each of Kubernetes and OpenStack content, if applicable.
The index file contains one or more toctrees, which define the manifest and structure of topics to be included in the document. The index file must be at the root of the document’s folder structure. If your document contains a mix of Kubernetes and OpenStack topics, create a subdirectory for each with an index file for those topics and link it to the top-level index.
For example:
$ mkdir -p doc/source/newbook
$ cd doc/source/newbook
$ mkdir kubernetes
$ mkdir opemstack
$ tox -e newfile # follow instructions for creating a new index stub
$ cd kubernetes
$ tox -e newfile # create an index stub for kubernetes content
$ cd ../openstack
$ tox -e newfile # create an index stub for OpenStack content
See Create rST Files for details on using tox -e newfile
In the book’s main index under doc/source/newbook, create entries to
the two subindexes:
==========
Kubernetes
==========

.. toctree::

   kubernetes/index-768a6e9aaeff

=========
OpenStack
=========

.. toctree::

   openstack/index-1b466179efc3
Add your Kubernetes and OpenStack content to the
kubernetes/index-768a6e9aaeff.rst and
openstack/index-1b466179efc3.rst files respectively. (Note that the
random strings 768a6e9aaeff and 1b466179efc3 were added by
tox -e newfile and will differ in your usage.)
Important
Additional indexes, either at the root of the document or in subfolders, are not allowed.
The following images provide examples of correct and incorrect layouts.
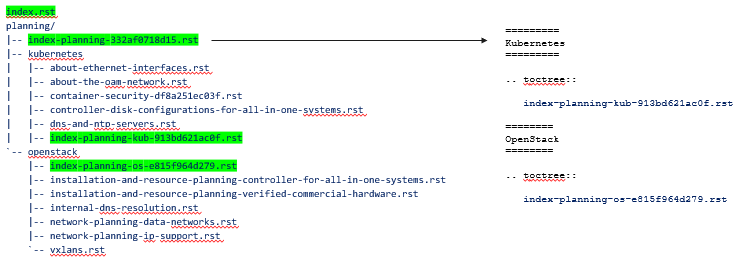
Correct Kubernetes/OpenStack layout
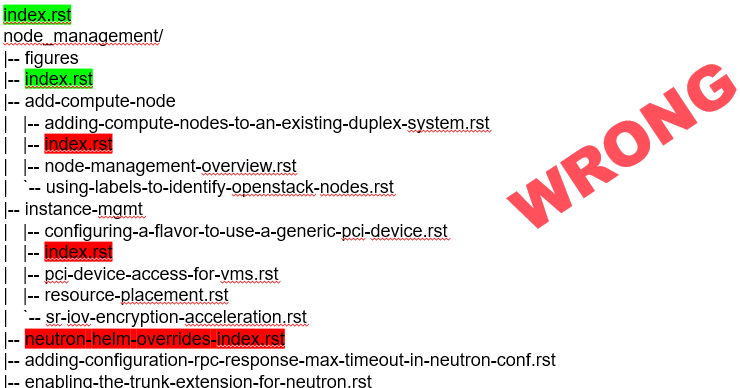
Incorrect Kubernetes/OpenStack layout
Use section headings in the index file to define document structure. For example:
.. _contribute:

==================
Contributor Guides
==================

Welcome to the StarlingX community! We are glad you are here.

If you are new to the project, take a moment to review the
`StarlingX wiki <https://wiki.openstack.org/wiki/StarlingX>`_.

---------------------------
Contribute to documentation
---------------------------

.. toctree::
   :maxdepth: 1

   doc_contribute_guide
   api_contribute_guide
   release_note_contribute_guide
   blog_contribute_guide
   website_contribute_guide


------------------
Contribute to code
------------------

StarlingX follows the `OpenStack developer contribution guidelines
<https://docs.openstack.org/infra/manual/developers.html>`_. Additional
StarlingX-specific resources are listed below.

.. toctree::
   :maxdepth: 1

   development_process
   /developer_resources/code-submission-guide
   /developer_resources/debug_issues

--------------------
Additional resources
--------------------

* `StarlingX wiki <https://wiki.openstack.org/wiki/StarlingX>`_
* :doc:`/developer_resources/index`
Folder structure
For any new document, create a new directory under source. Create a
subdirectory called figures to hold images.
for short, simple documents, you can place index and topic files directly in this new document directory.
for more complex documents with multiple chapters, create one subdirectory for each chapter, for example,
source/<book>/developer_resources.for documents that distinguish between Kubernetes and OpenStack, create one subdirectory for each. Any chapter directory should be created under these. For example:
source/<book>/kubernetes/developer_resources.See the section on Index rules for more information.
Writing style
StarlingX documentation follows many (but not all!) of the writing style guidelines described in the OpenStack documentation writing style guide. Differences between the StarlingX and OpenStack practices are highlighted below.
Use Title Case for page titles. For example:
===============================
Documentation Contributor Guide
===============================
Start section titles with an action verb. Do not use a gerund (word that ends with -ing). For example:
------------------
Configure endpoint
------------------
Create rST Files
Use the tox -e newfile command to create new rST files.
About this task
All rST files created in StarlingX documentation repositories must have the following characteristics:
They must have unique file names.
They must have rST labels at the beginning of the files that match the file names.
Important
These rules apply to index files as well as those containing user documentation.
A utility is available for use from within each documentation repository you have installed to generate uniquely named files for you.
Prerequisites
You must have uuidgen installed on your system. This program is included by default on most modern Linux distributions. If it is not installed, consult your distribution’s documentation for instructions.
Procedure
Change to the directory where you wish to create a new topic.
Typically, this will be below the
doc/sourcedirectory of the repository.Run the following tox command.
tox -e newfile
When prompted, enter a title for the new topic.
 You are about to create a new reStructuredText file in

 /home/jdoe/starlingx/docs/doc/source/intro

 or a content fragment file in doc/source/_includes

 If this is not what you want, press CTL-C to quit and change to the directory
 you want to create the file in.

 Enter a title for the new topic. The file name and topic label used for
 linking will be based on this value.


 Topic title:
Review the directory (an example is highlighted above) that the utility will create the new file in.
Note
This does not apply if you choose to create a content fragment using the f option when prompted. In that case, the file will be saved to
doc/source/_includesregardless of your current working directory.If this is not correct, press CTL-C to quit, change to the correct directory, and run the command again; otherwise, type the topic title and press ENTER.
When prompted, select the type of rST stub file you want to create.
Thanks. Now choose a topic type. Enter one of the following characters:

t) A task topic. Will contain the outline of a procedure.
i) An index.
r) A reference topic. Will contain a minimal list-table definition.
g) A minimal generic topic.
f) A content fragment included in an rST file. Will be saved to doc/source/_includes.
Topic type:
Each option creates a stub file with different templated content useful for getting started. Press the corresponding key.
Results
The new rST file is created.
The title used in the new rST file matches what you typed exactly. However, some changes have been made to the file name and topic label.
For example, if you entered Architectural Considerations! as a title,
listing the directory will show a file similar to the following:
$ ls
architectural-considerations--d9dd4c105700.rst
The following changes were made.
All alphabetical characters were converted to lower case.
Not shown The characters
+,-,@, and&are replaced withplus,minus,at, andandrespectively.All spaces and other special characters, such as the
!were replaced by dashes.A final dash and 12 digit random string were appended to the file name.
The extension
.rstwas added for all options except f, in which case the extension.restwas added.If you chose to create an
indexfile by selecting i when prompted,index-was prepended to the file name.
Examining the file reveals that the label matches the file name, while the title is preserved as typed. No label was added if you selected f.
cat architectural-considerations--d9dd4c105700.rst
.. _architectural-considerations--d9dd4c105700:

=============================
Architectural Considerations!
=============================

.. content here
When you reference this file in toctree and ref directives, use
the file name/label string like this: architectural-considerations--d9dd4c105700
Using tabbed content
Content on the master branch can take advantage of the sphinx-tabs
extension to organize content into tabs.
Tabs are useful for presenting alternate sets of content in a way that does not require that the reader interact with sets that are not of interest. This is particularly useful in procedures where some steps vary across two or more variable factors. Rather than maintain two or more separate procedures, tabs can be used to show one of the alternate sets of content. For example, the StarlingX installation procedures make heavy use of tabs to allow the reader to switch between virtual and bare-metal versions of the procedures.
See Install Kubernetes Platform on All-in-one Simplex for an example.
Basic tabs
Basic tabs are stand-alone. They have no relationship to other tabbed content on a page.
.. tabs::

   .. tab:: Apples

      Apples are green, or sometimes red.

   .. tab:: Pears

      Pears are green.

   .. tab:: Oranges

      Oranges are orange.
Apples are green, or sometimes red.
Pears are green.
Oranges are orange.
Nested tabs
Tab sets can be defined within other tab sets. While this can be useful for organizing logical hierarchies of information, care should be taken not to make readers ‘dig’ for relevant content, making it unnecessarily difficult to find.
Tip
Remember that the organizational goal of tabs is hide irrelevant information while making all relevant information visible.
.. tabs::

   .. tab:: Stars

      .. tabs::

         .. tab:: The Sun

            The closest star to us.

         .. tab:: Proxima Centauri

            The second closest star to us.

         .. tab:: Polaris

            The North Star.

   .. tab:: Moons

      .. tabs::

         .. tab:: The Moon

            Orbits the Earth

         .. tab:: Titan

            Orbits Jupiter
The closest star to us.
The second closest star to us.
The North Star.
Orbits the Earth
Orbits Jupiter
Group tabs
Tab sets can be grouped so that switching to a tab with a certain name in one set causes all other tab sets on the page to switch to the same tab. This can be very useful when the same alternatives recur many times on the same page. The reader only needs to select the tab that is relevant to them once to have the entire page switch to the appropriate content.
Do this by using the .. group-tab:: directive in place of the .. tab::
directive and by being sure to label all tabs consistently across tab sets.
In the example below, a reader can switch all tab sets to Linux, Mac OSX, or Windows by making the selection once, in any of the tab sets.
.. tabs::

   .. group-tab:: Linux

      Linux tab content - tab set 1

   .. group-tab:: Mac OSX

      Mac OSX tab content - tab set 1

   .. group-tab:: Windows

      Windows tab content - tab set 1

.. tabs::

   .. group-tab:: Linux

      Linux tab content - tab set 2

   .. group-tab:: Mac OSX

      Mac OSX tab content - tab set 2

   .. group-tab:: Windows

      Windows tab content - tab set 2

.. tabs::

   .. group-tab:: Linux

      Linux tab content - tab set 3

   .. group-tab:: Mac OSX

      Mac OSX tab content - tab set 3

   .. group-tab:: Windows

      Windows tab content - tab set 3
Try it out for yourself here:
Linux tab content - tab set 1
Mac OSX tab content - tab set 1
Windows tab content - tab set 1
Linux tab content - tab set 2
Mac OSX tab content - tab set 2
Windows tab content - tab set 2
Linux tab content - tab set 3
Mac OSX tab content - tab set 3
Windows tab content - tab set 3
Considerations for alternate builds
It is important to make allowances for builds of StarlingX documentation in contexts that may not support tabs, such as by other parties or for print output. To support such environments, the use of tabs must be conditionalized and the related content repeated for non tab scenarios. The following sample illustrates the standard way to achieve this:
.. only:: starlingx and html

   .. tabs::

      .. group-tab:: Bare Metal

         .. begin-install-prereqs-bm

         .. include:: /shared/_includes/installation-prereqs.rest
            :start-after: begin-install-prereqs
            :end-before: end-install-prereqs

         .. end-install-prereqs-bm

      .. group-tab:: Virtual

         .. begin-install-prereqs-virt

         Several pre-requisites must be completed prior to starting the |prod|
         installation.

         Before attempting to install |prod|, ensure that you have the the
         |prod| host installer ISO image file.

         Get the latest |prod| ISO from the `StarlingX mirror
         <https://mirror.starlingx.cengn.ca/mirror/starlingx/release/latest_release/debian/monolithic/outputs/iso/>`__.
         Alternately, you can get an older release ISO from `here <https://mirror.starlingx.cengn.ca/mirror/starlingx/release/>`__.

         .. end-install-prereqs-virt


   .. only:: partner and (html or latex)

      **********
      Bare Metal
      **********

      .. include:: /deploy_install_guides/release/bare_metal/aio_duplex_install_kubernetes.rst
         :start-after: begin-install-prereqs-bm
         :end-before: end-install-prereqs-bm

      *******
      Virtual
      *******

      .. include:: /deploy_install_guides/release/bare_metal/aio_duplex_install_kubernetes.rst
         :start-after: begin-install-prereqs-virt
         :end-before: end-install-prereqs-virt
In this example, the tabbed content is conditionalized to only appear in
StarlingX HTML output (.. only:: starlingx and html).
The .. begin-install-prereqs-bm, .. end-install-prereqs-bm, ..
begin-install-prereqs-virt and .. end-install-prereqs-virt comments allow
the contents of the Bare Netal and Virtual tabs to be included
conditionally in other builds that do not support tabs. In this example the
content is conditionalized in the .. only:: partner and (html or latex)
block.
Automated quality checks
Several automated checks are available to help improve and maintain the quality of your documentation.
Some of these checks are run every time you perform a build and are intended to catch errors before they are submitted for review. Others are invoked independently of regular builds and are intended to identify problems prior to a release.
Formatting checks
You can build the HTML documentation locally using the tox -e docs command.
After every successful build, several quality checks are performed against the
build HTML output.
Checking for "grey bar" formatting errors in output ...
Found 2 HTML file(s) with greybar formatting issues:
./dist_cloud/kubernetes/reinstalling-a-subcloud-with-redfish-platform-management-service.html
./dist_cloud/kubernetes/installing-a-subcloud-without-redfish-platform-management-service.html
Using a browser, locate vertical grey bars in the left margin of the above file(s), then correct the issue(s) in the corresponding rST file(s).
Checking for ".. include::" errors in output ...
Checking for unexpanded substitution errors in output ...
Found 1 HTML file(s) that may have unexpanded substitution(s):

./node_management/kubernetes/hardware_acceleration_devices/enabling-mount-bryce-hw-accelerator-for-hosted-vram-containerized-workloads.html:| 1d02      | |SATA| controller               | Intel Corporation   |

Correct the issue(s) in the corresponding rST file(s).
This sample shows three problems.
Test |
Explanation |
Remedy |
|---|---|---|
Grey bars |
Scans the output for evidence of rST vertical grey bars inserted into the output next to formatting errors and reports which files they were found in. |
Hint Grey bars are often caused by indentation errors. |
Include errors |
Scans the output for malformed |
As above, find the problem in the appropriate
Correct the issues by making the code comply with the documentation at: https://docutils.sourceforge.io/docs/ref/rst/directives.html#include |
Substitution errors |
Scans the output for potential unexpanded substitutions such as |prod| and reports which files they were found in, along with the offending lines of HTML. Note This check cannot distinguish between a substitution and an ascii output table where cells are not properly padded. In either case, the problem needs to be fixed. |
As above, find the problem in the appropriate Hint Substitutions are not allowed in code blocks, :ref:, :doc:,
or within rST markup such as Substitutions cannot be used in ASCII “picture” style tables. If you
need a substitution in a table, use the |
Broken internal links |
Validates HTML href attributes pointing to |
Check for missing target files or incorrect relative paths |
Missing alt text |
Identifies |
Accessibility compliance issues. All images should provide alt text describing the content. |
Oversized files |
Reports HTML files larger than 500KB |
Performance concerns for large pages. Consider whether the file can be logically broken up into smaller files. |
Duplicate file names |
Finds HTML files with identical names in different directories |
Potential navigation and linking conflicts. StarlingX documentation source files must have unique names. If a file name is not unique:
|
Problematic references |
Locates elements with |
Unresolved cross-references, broken links, and other issues flagged by Sphinx during the build. Reasons for output to be tagged as
|
Link checks
Link checks are not performed as part of regular documentation builds. They are intended to be run periodically and prior to a release.
You can invoke the Sphinx link checker with the following command:
$ tox -e linkcheck
Sphinx will perform a temporary build and then attempt to follow all external links from the output files. Results are reported on the console and logged for future use.
Note
You may need to disconnect any corporate firewall or VPN to allow the link checker to reach external sites.
Console output
The following two lines illustrate output for a valid and a bad link on lines 1 and 2 respectively. In each case the name of the file being checked, the line number the link was found on, and the link itself are reported. In the case of a broken link, the server error code is also shown, in this case a 404 file not found error. This indicates that the page may have moved or been deleted.
1(developer_resources/build_docker_image: line  120) ok        https://mirror.starlingx.windriver.com/mirror/starlingx/master/centos/latest_docker_image_build/outputs/wheels/stx-centos-stable-wheels.tar
2(developer_resources/build_docker_image: line  122) broken    https://mirror.starlingx.windriver.com/mirror/starlingx/master/centos/latest_docker_image_build/outputs/wheels/stx-centos-dev-wheels.tar - 404 Client Error: Not Found for url: https://mirror.starlingx.windriver.com/mirror/starlingx/master/centos/latest_docker_image_build/outputs/wheels/stx-centos-dev-wheels.tar
Logs
Non “OK” results such as file not found and permanent redirect are
logged under doc/build/linkcheck in two files:
doc/build/linkcheck/output.txtprovides a results log in plain-text format.doc/build/linkcheck/output.jsonprovides the same information inJSONformat.
Investigate all issues and update the links as needed. In the case of permanent redirects, replace the existing URL with that of the redirect target.
Spell checks
Spell checks are not performed as part of regular documentation builds. They are intended to be run periodically and prior to a release.
You can invoke the Sphinx link checker with the following command:
$ tox -e spellcheck
Sphinx will perform a temporary build and then check the output against a US English dictionary. Results are reported on the console and logged for future use.
Console output
Console output shows the path and name of the file an error was found in, the line number, the misspelled term and the full line to provide context.
doc/source/storage/openstack/config-and-management-ceph-placement-group-number-dimensioning-for-storage-cluster.rst:41: Spell check: aditional: used as aditional disk volumes for VMs booted from images.
Logs
Spell check logs are stored under doc/build/spelling in
*.spelling files located and named for their rst counterparts.
For example, errors found in the file:
doc/source/storage/openstack/config-and-management-ceph-placement-group-number-dimensioning-for-storage-cluster.rst
are logged in the file:
doc/build/spelling/storage/openstack/config-and-management-ceph-placement-group-number-dimensioning-for-storage-cluster.spelling
Log files itemize one issue per line. For example:
storage/openstack/config-and-management-ceph-placement-group-number-dimensioning-for-storage-cluster.rst:41: (aditional)  used as aditional disk volumes for VMs booted from images
storage/openstack/config-and-management-ceph-placement-group-number-dimensioning-for-storage-cluster.rst:68: (num)  For more information on how placement group numbers, (pg_num) can be set
storage/openstack/config-and-management-ceph-placement-group-number-dimensioning-for-storage-cluster.rst:72: (num)  group numbers (pg_num) required based on pg_calc algorithm, estimates on
storage/openstack/config-and-management-ceph-placement-group-number-dimensioning-for-storage-cluster.rst:116: (num)  To list all the pools with their pg_num values, use the following command,
storage/openstack/config-and-management-ceph-placement-group-number-dimensioning-for-storage-cluster.rst:119: (num)  To get only the pg_num / pgp_num value, use the following command,
storage/openstack/config-and-management-ceph-placement-group-number-dimensioning-for-storage-cluster.rst:119: (num)  To get only the pg_num / pgp_num value, use the following command,
storage/openstack/config-and-management-ceph-placement-group-number-dimensioning-for-storage-cluster.rst:142: (num)  Increasing pg_num of a pool has to be done in increments of 64/
storage/openstack/config-and-management-ceph-placement-group-number-dimensioning-for-storage-cluster.rst:142: (num)  pg_num number, retry and wait for the cluster to be
storage/openstack/config-and-management-ceph-placement-group-number-dimensioning-for-storage-cluster.rst:149: (num)  pg_num of that pool, using the following commands:
storage/openstack/config-and-management-ceph-placement-group-number-dimensioning-for-storage-cluster.rst:162: (num)  pgp_num should be equal to pg_num.
storage/openstack/config-and-management-ceph-placement-group-number-dimensioning-for-storage-cluster.rst:162: (num)  pgp_num should be equal to pg_num.
storage/openstack/config-and-management-ceph-placement-group-number-dimensioning-for-storage-cluster.rst:203: (num)  pg_num, pgp_num, crush_rule.
storage/openstack/config-and-management-ceph-placement-group-number-dimensioning-for-storage-cluster.rst:203: (num)  pg_num, pgp_num, crush_rule
Note that the spell check in this example matched on the substring num
several times in contexts such as pgp_num. Cases such as this may call for
additional spell check customization.
Adding words
StarlingX documentation makes use of many technical terms that are not known to the default dictionary.
You can add these to the file
doc/source/spelling_wordlist.txt.
This file contains one term per line.
Note
Care should be taken when adding terms to a custom dictionary to avoid errors not being reported. For example, “fs” may be correct in a code block but a typo in some other context. As a general rule, it is better to have the spell checker over-report than under-report.
It is important that
spelling_wordlist.txtbe kept in alphabetical order.spelling_wordlist.txtis under git management and changes must be submitted for review and merge via a gerrit review.
RST conventions
StarlingX documentation follows many (but not all!) of the RST conventions described in the OpenStack documentation RST conventions guide. If RST markup is not listed in this section’s quick reference, refer to the OpenStack guide.
For detailed information about RST and Sphinx extensions, refer to the following documents:
Command prompt conventions
Command examples in StarlingX are preceded by a shell prompt. These prompts provide readers with important hints about the context in which the command is to be used. It is important that the following prompts be used consistently throughout the StarlingX documentation.
$(dollar sign)Used to indicate that a command should be run in a Linux terminal as a regular user.
#(pound or hash sign)Used to indicate that a command should be run in a Linux terminal as a root user.
~(keystone_admin)]$Used to indicate that the command must be run within the sourced environment of a system controller, i.e. after running
$ source /etc/platform/openrc
Content reuse
Content can be reused in multiple places using the Sphinx .. include::
directive.
For example:
.. include:: /_includes/my_reusable_content.rest
“Include” files must not end in .rst. The StarlingX convention is to use
.rest.
You can store multiple fragments of content in a single include file and use
them in various places. To do this, use rst comments to delineate where
each begins and ends:
.. begin-fragement-1

   This content will be inserted using ``.. include::`` example 1, below.

.. end-fragment-1

.. begin-fragement-2

   This content will be inserted using ``.. include::`` example 2, below.

.. end-fragment-2
To use one or the other in an rst topic, use the start after
and end before parameters as shown below:
Example 1
========
My Topic
========

Integer sed tortor nisi. Vivamus feugiat, urna in posuere gravida, ligula
nunc hendrerit magna, nec tristique ex tortor non lorem.

...

.. include:: /_includes/my_reusable_content.rest
   :start-after: begin-fragement-1
   :end-before: end-fragement-1
Example 2
==============
My Other Topic
==============

Lorem ipsum dolor sit amet, consectetur adipiscing elit.

...

.. include:: /_includes/my_reusable_content.rest
   :start-after: begin-fragement-2
   :end-before: end-fragement-2
Content reuse in steps
Inserting reusable or conditional steps in a numbered list context causes the list to restart. For example:
An include file, mysteps.rest, containing:
.. begin-step

#. Blue

.. end-step
used in an rst file as follows:
#. Orange

#. Red

.. include:: mysteps.rest
   :start-after: begin-step
   :end-before: end-step

#. Green
Results in:
Orange
Red
Blue
Green
To avoid this, use substitute .. pre-include:: for .. include::
#. Orange

#. Red

.. pre-include:: mysteps.rest
   :start-after: begin-step
   :end-before: end-step

#. Green
This will result in the expected numbering sequence:
Orange
Red
Blue
Green
Note
Only the start-after and end-before parameters work with .. pre-include::.
Indentation of content included from a
.restfile will start at the character offset of the.. pre-include::directive. A base offset within the file may result in content being indented more than intended and cause Sphinx build errors.By having the indentation applied at build-time, the same content can be reused in multiple contexts with different indentation requirements.
Content conditionalization
Conditionalize across builds
If you need to conditionalize some content to be used in a specific build
context, such as StarlingX or a 3rd party build that reuses StarlingX content,
you can use the .. only:: directive.
For example:
.. only:: starlingx

   Integer sed tortor nisi. Vivamus feugiat, urna in posuere gravida, ligula
   nunc hendrerit magna, nec tristique ex tortor non lorem.
Three build contexts are available:
starlingxContent will be included in the standard StarlingX documentation build.
partnerContent will be excluded from the StarlingX documentation build. To reuse this content in a 3rd party build, ensure that the
partnertag is based to the builder.openstackContent will be included in an OpenStack documentation context. This content is included in the StarlingX documentation build.
Conditionalize across pages
If you want to reuse a block of content in multiple rst files from the same
build using .. include:: directives, but need to exclude specific strings
from one of those locations, you can use the hideable role and substitution.
You can hide both strings and blocks (paragraphs etc.).
Hiding strings
To hide a string, use the hideable role. For example:
.. start-prepare-servers-common

Prior to starting the |prod| installation, ensure that the |bare-metal|
servers are in the following state:

...

-   BIOS configured with Intel Virtualization (VTD, VTX)

    -  Disabled for controller-only servers and storage servers.

    -  Enabled for :hideable:`controller+worker (All-in-one) servers and` worker servers.

-   The servers are powered off.

.. end-prepare-servers-common
In the rst file where you want to include the text marked up with the
:hideable: role, simply insert the content using the include directive:
.. _aio_duplex_install_kubernetes_r7:

================================================
Install Kubernetes Platform on All-in-one Duplex
================================================

...

--------------------------------
Prepare Servers for Installation
--------------------------------

.. include:: /shared/_includes/prepare-servers-for-installation-91baad307173.rest
   :start-after: start-prepare-servers-common
   :end-before: end-prepare-servers-common

...
The bullet:
- Enabled for :hideable:`controller+worker (All-in-one) servers and` worker servers.
will render as:
Enabled for controller+worker (All-in-one) servers and worker servers.
In the rst file where you want to suppress the text marked up with the
:hideable: role, do the same, but add the |hideable| substitution at the
top of the file:
|hideable|

.. _aio_duplex_install_kubernetes_r7:

================================================
Install Kubernetes Platform on All-in-one Duplex
================================================

...

--------------------------------
Prepare Servers for Installation
--------------------------------

.. include:: /shared/_includes/prepare-servers-for-installation-91baad307173.rest
   :start-after: start-prepare-servers-common
   :end-before: end-prepare-servers-common

...
The bullet:
- Enabled for :hideable:`controller+worker (All-in-one) servers and` worker servers.
will render as:
Enabled for worker servers.
Hiding blocks
To hide a block, wrap it in a container directive with the argument
hideable
For example, create an include file install-status.rest with the
following contents:
The **deploy status** field has the following values:

.. container:: hideable

   ``Pre-Install``
       This status indicates that the ISO for the subcloud is being updated by
       the Central Cloud with the boot menu parameters, and kickstart
       configuration as specified in the ``install-values.yaml`` file.

   ``Installing``
       This status indicates that the subcloud's ISO is being installed from
       the Central Cloud to the subcloud using the Redfish Virtual Media
       service on the subcloud's |BMC|.

.. container::

   ``Bootstrapping``
       This status indicates that the Ansible bootstrap of |prod-long|
       software on the subcloud's controller-0 is in progress.
and load it in two different contexts:
.. include:: install-status.rest
|hideable|

.. include:: install-status.rest
The output from a.rst will include all three definitions. The output from
b.rst will include only the bootstrap definition.
Removing empty table rows
A table may occasionally contain rows with conditionalized content that applies only in one context, resulting in empty rows in the output from other contexts.
You can suppress the output of empty rows by adding |hide-empty-rows| to
the files in which you want this behavior. All empty rows will be hidden in the
files where you make this addition.
Note
If you are also using empty rows as separators between sections in longer tables, then this behavior may not be what you want.
Removing table columns
A table may contain columns that you want to appear in one publishing context but not another.
You can supress the output of one or more columns from a publishing context by adding metadata to the reStructuredText file containing the table.
If the conditionalization is unidirectional (applies to only one build or is
the same everywhere used), you can add the metadata directly to the rst
file.
Example
.. meta::
   :remove-column-from-html-table: Memory Requirements,Node
   :remove-column-emptied-row: 1
   :docs-build-context: starlingx
where:
remove-column-from-html-tableis a manditory metadata field and must contain one or more column names separated by commas.
Do not add spaces after commas.
Column names are case and space sensitive. They must match the name used in the table header row exactly.
remove-column-emptied-rowis an optional metadata field. If set, empty rows will also be removed after column removal. This is usful to clean up rows that only contained content in the removed column, and are thus left empty.
Set the value to
1to enable this option. Rows will not be removed if you set any other value or ifremove-column-emptied-rowdoes not exist.Note
This feature is different from removing empty table rows using
|hide-empty-rows|as described in Removing empty table rows. In that case the removal is global to a file. In this case it is per modified table.docs-build-contextspecifies the documentation build(s) for which you want to remove columns from a reStructuredText file. For example, to remove the columns
Memory RequirementsandNodefrom a file in the StarlingX build, set the value tostarlingx. Multiple contexts must be separated by commas, without spaces.Warning
If you embed metadata directly into a reStructuredText file and do not set
docs-build-context, then columns will be removed in all build contexts. This is probably not what you want.
You can also achieve bi or multidirectional conditionalization, such as
removing the column Memory Requirements from StarlingX builds, but removing
the column Node from the same table in some other build while leaving both
intact in a third.
To do this, instead of embedding metadata directly in the file, use an include file with different metadata in each build context.
Example
In the context where you want to remove
Memory Requirements, create an include file namedremove-mem-requirements-and-node-cols.restwith the following content:.. meta:: :remove-column-from-html-table: Memory Requirements :remove-column-emptied-row: 1
Note
Do not use the
docs-build-contextoption if using include files.In the context where
Nodebe removed, create an include file namedremove-mem-requirements-and-node-cols.restwith the following content:.. meta:: :remove-column-from-html-table: Node :remove-column-emptied-row: 1
In the context where neither column will be removed, create an empty file named
remove-mem-requirements-and-node-cols.rest.Include this file at the beginning of the reStructuredText containing the table:
.. include:: remove-mem-requirements-and-node-cols.rest
The metadata will be added via the include file when processing the file in
each publishing context, resulting in the column Memory Requirements being
removed from one build and Node from the second. Neither column will be
removed from the third.
Limitations:
This feature operates globally across all tables in input files where the specified column names are found. Use caution to prevent a column you want to remove from one table being removed from other tables in the file.
The
remove-column-emptied-rowoption removes all empty rows from processed tables. If you are using empty rows as separators between sections in longer tables, then this behavior may not be what you want.To use the
docs-build-context, an environment variable namedDOCS_BUILD_CONTEXTmust be set and readable by the build toolchain. The value of this variable must be passed todocs-build-contextfor a reStructuredText file to be processed in the build.This feature will not work with tables that do not have header rows. Columns to be removed must be named.
This feature relies on the HTML
<table>syntax. It will not work with tables that are constructed using other elements such as<div>. reStructuredText tables are rendered using HTML<table>elements.
RST quick reference
Acronyms
Define acronym at first instance on page. After definition, use acronym only.
Input:
:abbr:`CPU (Central Processing Unit)`
Output:
CPU
Code samples
Format code snippets as standalone literal blocks.
Input:
::

  ping 8.8.8.8
Output:
ping 8.8.8.8
Commands
Format commands using the Sphinx command role.
Input:
:command:`system help`
Output:
Use the system help command for the full list of options.
Cross-references
Cross-reference to arbitrary locations in a document using the ref role and
a named target. Named targets must precede a section heading. For more
information on references, see Internal Hyperlink Targets.
When using external references, be sure to prefix the URL with either
http:// or https://. For example:
`Internal Hyperlink Targets
<http://docutils.sourceforge.net/docs/user/rst/quickref.html#internal-hyperlink-targets>`_.
Note
When providing an example of a URL format, treat the example as code by
either placing it in a .. code-block:: or in double backticks, for
example:
``https://<fqdn>/<path>``
Input:
.. _my_named_target:

**********
My section
**********

This is the section we want to reference.

...

This is the reference to :ref:`my_named_target`.
Output:
My section
This is the section we want to reference.
…
This is the reference to My section.
Information blocks
Emphasize information using notices (an admonition in Sphinx). Different types of notices exist to emphasize degrees of information importance.
Input:
.. note::

   Use a ``note`` for a generic message.

.. seealso::

   Use ``seealso`` for extra but helpful information.

.. important::

   Use ``important`` for details that can be easily missed, but should not be
   ignored by a user and are valuable before proceeding.

.. warning::

   Use ``warning`` to call out information the user must understand
   to avoid negative consequences.
Output:
Note
Use a note for a generic message.
See also
Use seealso for extra but helpful information.
Important
Use important for details that can be easily missed, but should not be
ignored by a user and are valuable before proceeding.
Warning
Use warning to call out information the user must understand
to avoid negative consequences.
Inline elements
Format most inline elements such as filenames and paths, code fragments, parameters, or options with double back ticks.
Input:
``/path/to/file.name``
``--option``
Output:
Open the /path/to/file.name file.
Optionally pass the --option with the command.
Refer to the OpenStack Inline elements guide for markup for other inline elements.
Lists
Use a bulleted list for a sequence of items whose order does not matter, such as a list of features.
Input:
* Banana
* Apple
* Orange
Output:
Banana
Apple
Orange
Use an enumerated list for a sequence of items whose order matters, such as in an ordered sequence of installation steps.
Input:
#. Wash apple.
#. Peel apple.
#. Eat apple.
Output:
Wash apple.
Peel apple.
Eat apple.
Use a definition list for an unordered list where each item has a short definition, such as term/definition pairs.
Input:
Command A
  Description of command A.

Command B
  Description of command B.
Output:
- Command A
Description of command A.
- Command B
Description of command B.
Section headings
Use up to three levels of headings in one file using the following characters:
Heading 1 (Page Title in Title Case) - underline and overline with equal signs;
Heading 2 (Major page sections in Sentence case) - underline and overline with dashes;
Heading 3 (subsections in Sentence case) - underline and overline with asterisks.
Example RST:
==============
Document Title
==============

Introduce the topic using 1-2 concise sentences. It should tell the user what
info can be found on this page.

.. contents::  // Use a local TOC to aid user navigation in the page
   :local:
   :depth: 1

---------------
Section heading
---------------

Lorem ipsum dolor sit amet, consectetur adipiscing elit.

******************
Subsection heading
******************

Integer sed tortor nisi. Vivamus feugiat, urna in posuere gravida, ligula
nunc hendrerit magna, nec tristique ex tortor non lorem.
Release activities
Several activities must be completed in preparation for each release.
Release notes updates
Various sections in the StarlingX release notes must be updated on the master
branch before the release branch for the upcoming release (for example
r/stx.9.0) is created.
The Release notes can be found in the directory
doc/source/releasenotes.
Version number updates
Product and related software version numbers must be updated throughout the
source rst files.
Some of these changes must me made manually by searching for and replacing the appropriate values.
More common version values are implemented as Sphinx substitutions: simple, reusable placeholders.
For the current version of StarlingX, edit the value of
this-verin the filedoc/source/_this.txt... |this-ver| replace:: r9.0
For other values, consult the file
doc/source/_vendor/vendor_strings.txt.
Adding the promote job
A promote job must be created for merged reviews on a new release branch to
be published to docs.starlingx.io.
Prerequisites
You must have the OpenStack project-config repo available.
Procedure
In the
project-configrepo, open the filezuul.d/starlingx-jobs.yaml.Locate the
promote-stx-tox-docs-sitejob.Add the new branch to the list of branches that will be published.
For example:
- job:
    name: promote-stx-tox-docs-site
    parent: opendev-promote-docs-base
    description: |
      Promote content from openstack-tox-docs job for
      starlingx/doc repository only.

      Publish the results of a sphinx build to
      /afs/.openstack.org/project/starlingx.io/www

    final: true
    vars:
      download_artifact_job: openstack-tox-docs
    # add older release branches as desired
    branches:
      - master
      - r/stx.5.0
      - r/stx.6.0
      - r/stx.7.0
      - r/stx.8.0
      - r/stx.9.0
Save the file and commit a gerrit review.
See https://review.opendev.org/c/openstack/project-config/+/873266 for a sample promote job update with reviewers.
