[ English | Indonesia | русский ]
Mengelola instance
Bab ini menjelaskan cara membuat dan mengakses instance.
Membuat instance menggunakan Dasbor
Menggunakan image, buat instance baru melalui opsi Dasbor.
Log into the Dashboard, and select the admin project from the drop down list.
On the Project tab, open the Instances tab and click the Launch Instance button.
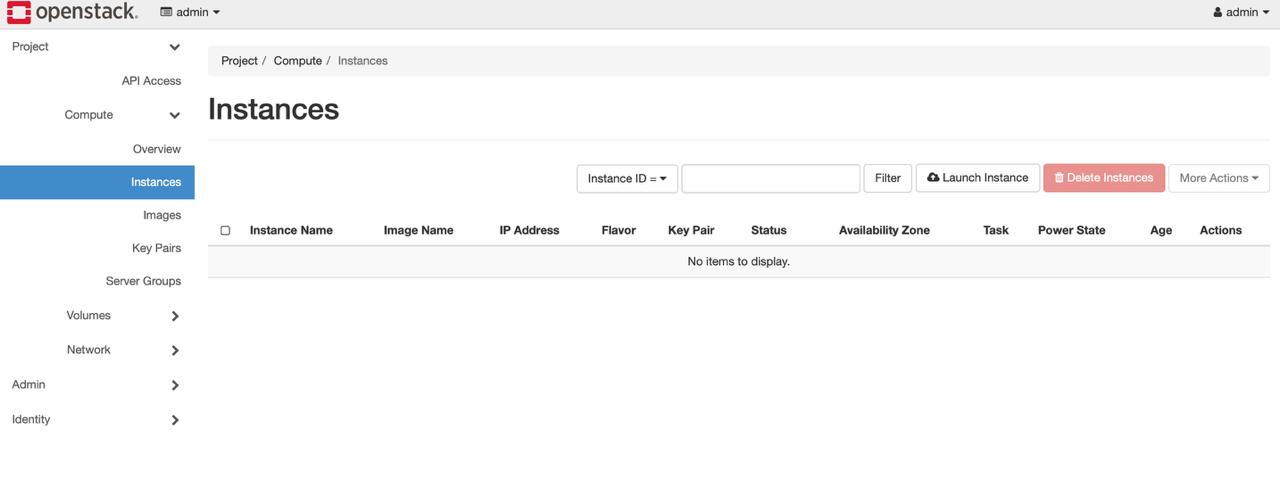
Figure Dashboard — Instances tab
Check the Launch Instance dialog, and find the Details tab. Enter the appropriate values for the instance.

Instance Details
Click the Source. In the Source step, select the boot source: Image, Volume (Volume Snapshot), or Instance Snapshot. If you choose Image, pick the desired OS or custom image from the list to boot your instance. Volume option will only be available if Block Storage service (cinder) is enabled.
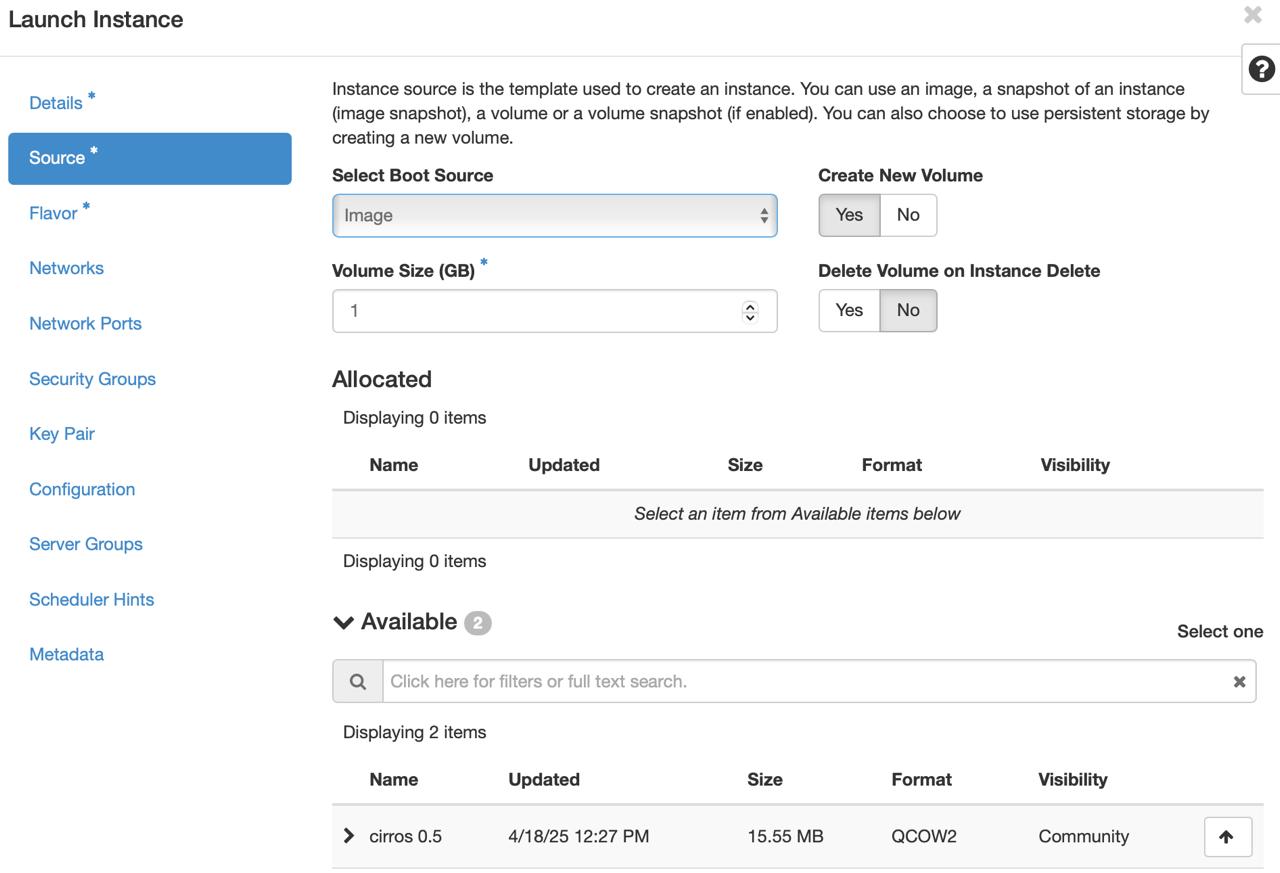
Instance Source
Untuk informasi lebih lanjut tentang melampirkan volume Block Storage ke instance untuk penyimpanan persisten, lihat bagian Managing volumes for persistent storage di bawah ini.
In the Launch Instance dialog, click the Flavor tab and select the prefered flavor for you instance.
Click the Networks tab. This tab will be unavailable if Network service (neutron) has not been enabled. If networking is enabled, select the networks on which the instance will reside.
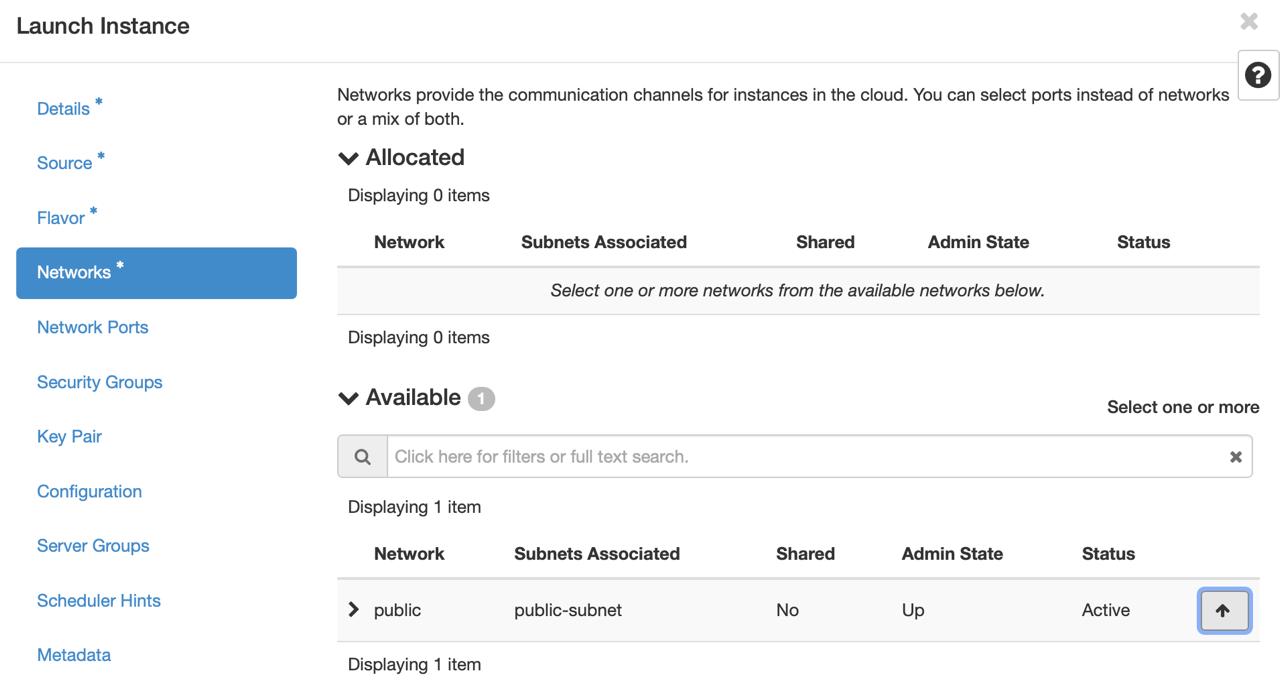
Instance Networks
Click the Keypair tab and select the keypair or create new one.
Click the Security Groups tab and set the security group as "default".
Add customisation scripts, if needed, by clicking the Configuration. These run after the instance has been created. Some instances support user data, such as root passwords, or admin users. Enter the information specific to the instance here if required.
Click Launch to create the instance. The instance will start on a compute node. The Instances page will open and start creating a new instance. The Instances page that opens will list the instance name, size, status, and task. Power state and public and private IP addresses are also listed here.
Prosesnya akan memakan waktu kurang dari satu menit untuk selesai. Pembuatan instance selesai ketika status terdaftar sebagai aktif. Segarkan halaman untuk melihat instance aktif baru.
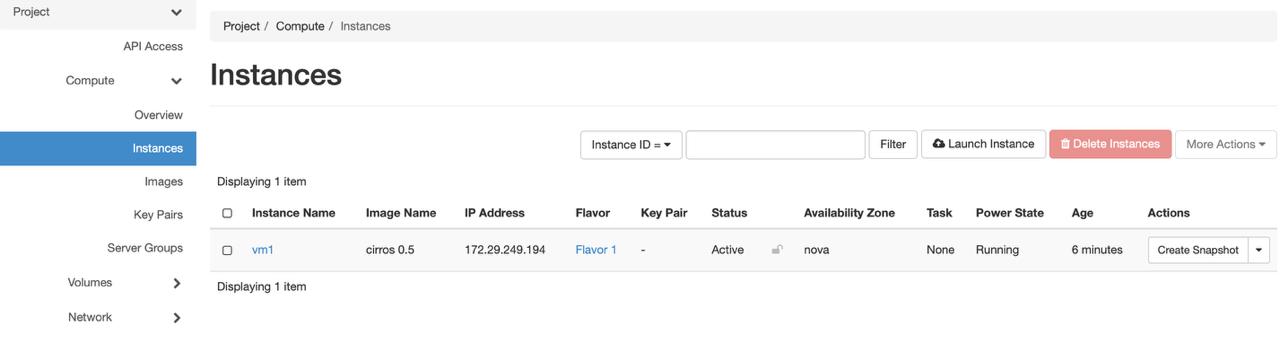
Instances Page
Launching an instance options¶ Field Name
Required
Details
Availability Zone
Optional
Zona ketersediaan tempat layanan image membuat instance. Jika tidak ada zona ketersediaan yang ditentukan, tidak akan ada instance yang ditemukan. Penyedia awan menetapkan zona ketersediaan ke nilai tertentu.
Instance Name
Required
Nama instance baru, yang menjadi nama host awal server. Jika nama server diubah dalam API atau langsung diubah, nama Dasbor tetap tidak berubah
Image
Required
The type of container format, one of
raw,qcow2,iso,vmdk,``vdi`` etc.Flavor
Required
Konfigurasi vCPU, Memory, dan Disk. Perhatikan bahwa flavor yang lebih besar dapat membutuhkan waktu lama untuk dibuat. Jika membuat instance untuk pertama kalinya dan menginginkan sesuatu yang kecil untuk diuji, pilih
m1.small.Instance Count
Required
Jika membuat beberapa instance dengan konfigurasi ini, masukkan bilangan integer ke nomor yang diizinkan oleh kuota, yaitu
10secara default.Instance Boot Source
Required
Tentukan apakah instance akan didasarkan pada image atau snapshot. Jika ini kali pertama membuat instance, belum akan ada snapshot yang tersedia.
Image
Required
Instance akan boot dari image yang dipilih. Opsi ini akan terisi sebelumnya dengan instance yang dipilih dari tabel. Namun, pilih
Boot from Snapshotdi Instance Boot Source, dan itu akan menjadi default untukSnapshotsebagai gantinya.Security Groups
Optional
Opsi ini memberikan grup keamanan ke instance. Grup keamanan default diaktifkan ketika tidak ada grup khusus yang ditentukan di sini. Grup Keamanan, mirip dengan firewall cloud, menentukan lalu lintas jaringan masuk yang diteruskan ke instance.
Keypair
Optional
Tentukan pasangan kunci dengan opsi ini. Jika image menggunakan static key set (tidak disarankan), pasangan kunci tidak diperlukan.
Networks
Optional
To add a network to an instance, click the Downwards Arrow symbol in the Networks field.
Configuration
Optional
Tentukan skrip penyesuaian. Skrip ini berjalan setelah instance diluncurkan dan menjadi aktif.
Membuat instance menggunakan command line
Pada command line, pembuatan instance dikelola dengan perintah openstack server create. Sebelum meluncurkan sebuah instance, tentukan image dan flavor apa yang tersedia untuk membuat instance baru menggunakan perintah openstack image list dan openstack flavor list.
Masuk ke kontainer utilitas apa pun.
Berikan perintah openstack server create dengan nama untuk instance, bersama dengan nama image dan flavor untuk digunakan:
$ openstack server create --image precise-image --flavor 2 --key-name example-key example-instance
+-------------------------------------+--------------------------------------+
|               Property              |                Value                 |
+-------------------------------------+--------------------------------------+
|          OS-DCF:diskConfig          |                MANUAL                |
|         OS-EXT-SRV-ATTR:host        |                 None                 |
| OS-EXT-SRV-ATTR:hypervisor_hostname |                 None                 |
|    OS-EXT-SRV-ATTR:instance_name    |          instance-0000000d           |
|        OS-EXT-STS:power_state       |                  0                   |
|        OS-EXT-STS:task_state        |              scheduling              |
|         OS-EXT-STS:vm_state         |               building               |
|              accessIPv4             |                                      |
|              accessIPv6             |                                      |
|              adminPass              |             ATSEfRY9fZPx             |
|             config_drive            |                                      |
|               created               |         2012-08-02T15:43:46Z         |
|                flavor               |               m1.small               |
|                hostId               |                                      |
|                  id                 | 5bf46a3b-084c-4ce1-b06f-e460e875075b |
|                image                |             precise-image            |
|               key_name              |              example-key             |
|               metadata              |                  {}                  |
|                 name                |           example-instance           |
|               progress              |                  0                   |
|                status               |                BUILD                 |
|              tenant_id              |   b4769145977045e2a9279c842b09be6a   |
|               updated               |         2012-08-02T15:43:46Z         |
|               user_id               |   5f2f2c28bdc844f9845251290b524e80   |
+-------------------------------------+--------------------------------------+
Untuk memeriksa apakah instance telah berhasil dibuat, berikan perintah openstack server list:
$ openstack server list
+------------------+------------------+--------+-------------------+---------------+
|        ID        |       Name       | Status |      Networks     |   Image Name  |
+------------------+------------------+--------+-------------------+---------------+
| [ID truncated]   | example-instance | ACTIVE |  public=192.0.2.0 | precise-image |
+------------------+------------------+--------+-------------------+---------------+
Mengelola sebuah instance
Log in to the Dashboard. Select one of the projects, and click Instances.
Pilih sebuah instance dari daftar instance yang tersedia.
Check the Actions column, and click on the down arrow. Select the action.
Kolom Actions berisi opsi berikut:
Ubah ukuran atau rekondisi setiap instance
Attach/Detach Volume
Attach/Detach Interface
Lihat log konsol instance
Edit instance
Edit security groups
Pause, resume, rescue or suspend the instance
Pengaturan ulang perangkat lunak atau keras instance
Catatan
Delete the instance under the Actions column.
Managing volumes for persistent storage
Volume melampirkan ke instance, memungkinkan penyimpanan persisten. Penyimpanan volume menyediakan sumber memori untuk instance. Administrator dapat melampirkan volume ke instance yang sedang berjalan, atau memindahkan volume dari satu instance ke instance lainnya.
Instances live migration
Nova mampu melakukan migrasi langsung dari satu host ke host yang berbeda untuk mendukung berbagai tugas operasional termasuk:
Pemeliharaan Host
Manajemen kapasitas host
Mengubah ukuran dan memindahkan instance ke perangkat keras yang lebih baik
Implikasi drive konfigurasi Nova
Bergantung pada versi OpenStack-Ansible yang digunakan, Nova dapat dikonfigurasi untuk memaksa attachment drive konfigurasi ke instance. Dalam hal ini, image CD-ROM ISO9660 akan tersedia untuk instance melalui titik mount /mnt. Ini dapat digunakan oleh alat, seperti cloud-init, untuk mendapatkan akses ke metadata instance. Ini adalah cara alternatif untuk mengakses Metadata bergaya Nova EC2.
To allow live migration of Nova instances, this forced provisioning of the config (CD-ROM) drive needs to either be turned off, or the format of the configuration drive needs to be changed to a disk format like vfat, a format which both Linux and Windows instances can access.
Pekerjaan ini diperlukan untuk semua versi Libvirt sebelum 1.2.17.
To turn off the forced provisioning of and change the format of the
configuration drive to a hard disk style format, add the following
override to the /etc/openstack_deploy/user_variables.yml file:
nova_nova_conf_overrides:
  DEFAULT:
    config_drive_format: vfat
    force_config_drive: false
Tunneling versus transportasi langsung
Dalam konfigurasi default, Nova menentukan URL transportasi yang benar untuk cara mentransfer data dari satu host ke yang lain. Tergantung pada nova_virt_type mengganti konfigurasi berikut yang digunakan:
kvm default ke
qemu+tcp://%s/systemqemu default ke
qemu+tcp://%s/system
Libvirt port TCP untuk mentransfer data untuk bermigrasi.
OpenStack-Ansible mengubah pengaturan default dan menggunakan koneksi SSH terenkripsi untuk mentransfer data instance.
live_migration_uri = "qemu+ssh://nova@%s/system?no_verify=1&keyfile={{ nova_system_home_folder }}/.ssh/id_rsa"
Konfigurasi lain dapat dikonfigurasi di dalam ke /etc/openstack_deploy/user_variables.yml:
nova_nova_conf_overrides:
  libvirt:
    live_migration_completion_timeout: 0
    live_migration_progress_timeout: 0
    live_migration_uri: "qemu+ssh://nova@%s/system?keyfile=/var/lib/nova/.ssh/id_rsa&no_verify=1"
Melaksanakan migrasi
Migrasi langsung dapat diakses melalui klien nova.
nova live-migration [--block-migrate] [--force] <uuid> [<host>]
Examplarery live migration pada penyimpanan lokal:
nova live-migration --block-migrate <uuid of the instance> <nova host>
Memantau status
Setelah permintaan migrasi langsung diterima, status dapat dipantau dengan klien nova:
nova migration-list

+-----+------------+-----------+----------------+--------------+-----------+-----------+---------------+------------+------------+------------+------------+-----------------+
| Id | Source Node | Dest Node | Source Compute | Dest Compute | Dest Host | Status    | Instance UUID | Old Flavor | New Flavor | Created At | Updated At | Type            |
+----+-------------+-----------+----------------+--------------+-----------+-----------+---------------+------------+------------+------------+------------+-----------------+
| 6  | -           | -         | compute01      | compute02    | -         | preparing | f95ee17a-d09c | 7          | 7          | date       | date       | live-migration  |
+----+-------------+-----------+----------------+--------------+-----------+-----------+---------------+------------+------------+------------+------------+-----------------+
Untuk memfilter daftar, opsi --host atau --status dapat digunakan:
nova migration-list --status error
Dalam kasus di mana migrasi langsung gagal, baik sumber dan tujuan menghitung node perlu diperiksa untuk kesalahan. Biasanya cukup mencari UU UU hanya untuk menemukan kesalahan yang terkait dengan migrasi langsung.
Bentuk lain dari migrasi instance
Selain migrasi langsung, Nova menawarkan opsi untuk memigrasikan seluruh host dalam migrasi online (langsung) atau offline (dingin).
Perintah klien nova berikut disediakan:
host-evacuate-liveLive bermigrasi semua instance dari host yang ditentukan ke host lain jika pemanfaatan sumber daya memungkinkan. Cara terbaik adalah menggunakan penyimpanan bersama seperti Ceph atau ZFS untuk evakuasi host.
host-servers-migratePerintah ini mirip dengan meng-host evakuasi tetapi memindahkan semua instance dari host yang ditentukan saat mereka shutdown.
resizeChanges the flavor of an instance (increase) while rebooting and also migrates (cold) the instance to a new host to accommodate the new resource requirements. This operation can take considerate amount of time, depending disk image sizes.
