[ English | русский | Deutsch | Indonesia | English (United Kingdom) ]
Scaling MariaDB and RabbitMQ
OpenStack is a cloud computing platform that is designed to be highly scalable. However, even though OpenStack is designed to be scalable, there are a few potential bottlenecks that can occur in large deployments. These bottlenecks typically involve the performance and throughput of RabbitMQ and MariaDB clusters.
RabbitMQ is a message broker that is used to decouple different components of OpenStack. MariaDB is a database that is used to store data for OpenStack. If these two components are not performing well, it can have a negative impact on the performance of the entire OpenStack deployment.
There are a number of different methodologies that can be used to improve the performance of RabbitMQ and MariaDB clusters. These methodologies include scaling up the clusters, using a different message broker or database, or optimizing the configuration of the clusters.
In this series of articles, will be discussed the potential bottlenecks that can occur in large OpenStack deployments and ways to scale up deployments to improve the performance of RabbitMQ and MariaDB clusters.
Note
Examples provided in this documentation were made on OpenStack 2023.1 (Antelope). It is possible to achieve the same flows in earlier releases, but some extra steps or slightly different configurations might be required.
Most Common Deployment
Before talking about ways on how to improve things, let’s quickly describe “starting point”, to understand what we’re dealing with at the starting point.
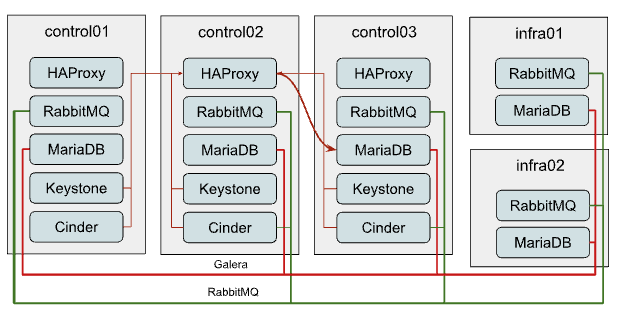
The most common OpenStack-Ansible deployment design is three control nodes, each one is running all OpenStack API services along with supporting infrastructure, like MariaDB and RabbitMQ clusters. This is a good starting point for small to medium-sized deployments. However, as the deployment grows, you may start to experience performance problems. Typically communication between services and MySQL/RabbitMQ looks like this:

MariaDB
As you might see on the diagram, all connections to MariaDB come through the HAProxy which has Internal Virtual IP (VIP). OpenStack-Ansible does configure the Galera cluster for MariaDB, which is a multi-master replication system. Although you can issue any request to any member of the cluster, all write requests will be passed to the current “primary” instance creating more internal traffic and raising the amount of work each instance should do. So it is recommended to pass write requests only to the “primary” instance.
However HAProxy is not capable of balancing MySQL queries at an application level (L7 of OSI model), to separate read and write requests, so we have to balance TCP streams (L3) and pass all traffic without any separation to the current “primary” node in the Galera cluster, which creates a potential bottleneck.
RabbitMQ
RabbitMQ is clustered differently. We supply IP addresses of all cluster members to clients and it’s up to the client to decide which backend it will use for interaction. Only RabbitMQ management UI is balanced through haproxy, so the connection of clients to queues does not depend on HAProxy in any way.
Though usage of HA queues and even quorum queues makes all messages and queues to be mirrored to all or several cluster members. While quorum queues show way better performance, they still suffer from clustering traffic which still becomes a problem at a certain scale.
Option 1: Independent clusters per service
With this approach, you might provide the most loaded services, like Nova or Neutron, their standalone MariaDB and RabbitMQ clusters. These new clusters might reside on a separate hardware.
In the example below we assume that only Neutron is being reconfigured to use the new standalone cluster, while other services remain sharing the already existing one. So Neutron connectivity will look like this:
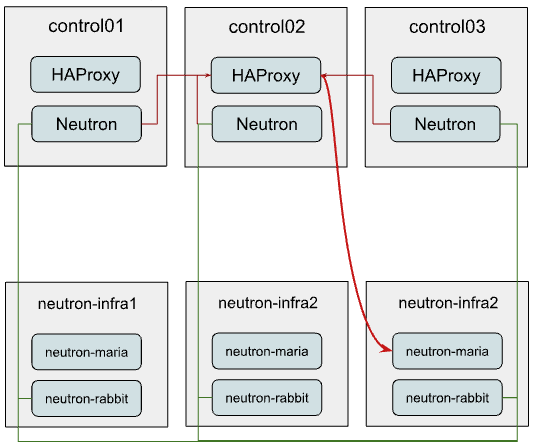
As you might have noticed, we still consume the same HAProxy instance for MariaDB balancing to the new infra cluster.
Next, we will describe how to configure such a stack and execute the service transition to this new layout.
Setup of new MariaDB and RabbitMQ clusters
To configure such a layout and migrate Neutron using it with OpenStack-Ansible you need to follow these steps:
Note
You can reference the following documentation for a deeper understanding of how env.d and conf.d files should be constructed: Understanding the inventory
Define new groups for RabbitMQ and MariaDB. For that, you can create files with the following content:
/etc/openstack_deploy/env.d/galera-neutron.yml:
# env.d file are more clear if you read them bottom-up
# At component skeleton you map component to ansible groups
component_skel:
  # Component itself is an ansible group as well
  neutron_galera:
  # You tell in which ansible groups component will appear
  belongs_to:
    - neutron_galera_all
    - galera_all

# At container skeleton you link components to physical layer
container_skel:
  neutron_galera_container:
    # Here you define on which physical hosts container will reside
    belongs_to:
      - neutron-database_containers
    # Here you define which components will reside on container
   contains:
     - neutron_galera

# At physical skeleton level you map containers to hosts
physical_skel:
  # Here you tell to which global group containers will be added
  # from the host in question.
  # Please note, that <name>_hosts and <name>_containers are
  # interconnected, and <name> can not contain underscores.
  neutron-database_containers:
    belongs_to:
      - all_containers

# You define `<name>_hosts` in your openstack_user_config or conf.d
# files to tell on which physical hosts containers should be spawned
neutron-database_hosts:
  belongs_to:
    - hosts
/etc/openstack_deploy/env.d/rabbit-neutron.yml:
# env.d file are more clear if you read them bottom-up
# At component skeleton you map component to ansible groups
component_skel:
  # Component itself is an ansible group as well
  neutron_galera:
    # You tell in which ansible groups component will appear
    belongs_to:
      - neutron_galera_all
      - galera_all

# At container skeleton you link components to physical layer
container_skel:
  neutron_galera_container:
    # Here you define on which physical hosts container will reside
    belongs_to:
      - neutron-database_containers
    # Here you define which components will reside on container
    contains:
      - neutron_galera
# At physical skeleton level you map containers to hosts
physical_skel:
  # Here you tell to which global group containers will be added
  # from the host in question.
  # Please note, that <name>_hosts and <name>_containers are
  # interconnected, and <name> can not contain underscores.
  neutron-database_containers:
    belongs_to:
      - all_containers

  # You define `<name>_hosts` in your openstack_user_config or conf.d
  # files to tell on which physical hosts containers should be spawned
  neutron-database_hosts:
    belongs_to:
      - hosts
/etc/openstack_deploy/env.d/rabbit-neutron.yml:
# On the component level we are creating group `neutron_rabbitmq`
# that is also part of `rabbitmq_all` and `neutron_rabbitmq_all`

component_skel:
  neutron_rabbitmq:
    belongs_to:
      - rabbitmq_all
      - neutron_rabbitmq_all

# On the container level we tell to create neutron_rabbitmq on
# neutron-mq_hosts
container_skel:
  neutron_rabbit_mq_container:
    belongs_to:
      - neutron-mq_containers
    contains:
      - neutron_rabbitmq

# We define the physical level as a base level which can be consumed
# by container and component skeleton.
physical_skel:
  neutron-mq_containers:
    belongs_to:
      - all_containers
  neutron-mq_hosts:
    belongs_to:
      - hosts
Map your new neutron-infra hosts to these new groups. To add to your
openstack_user_config.yml the following content:
neutron-mq_hosts: &neutron_infra
  neutron-infra1:
    ip: 172.29.236.200
  neutron-infra2:
    ip: 172.29.236.201
  neutron-infra3:
    ip: 172.29.236.202
neutron-database_hosts: *neutron_infra
Define some specific configurations for newly created groups and balance them:
MariaDB
In file
/etc/openstack_deploy/group_vars/neutron_galera.yml:galera_cluster_members: "{{ groups['neutron_galera'] }}" galera_cluster_name: neutron_galera_cluster galera_root_password: mysecret
In file /etc/openstack_deploy/group_vars/galera.yml:
galera_cluster_members: "{{ groups['galera'] }}"
Move galera_root_password from
/etc/openstack_deploy/user_secrets.ymlto/etc/openstack_deploy/group_vars/galera.ymlRabbitMQ
In file
/etc/openstack_deploy/group_vars/neutron_rabbitmq.yml:
rabbitmq_host_group: neutron_rabbitmq
rabbitmq_cluster_name: neutron_cluster
In file /etc/openstack_deploy/group_vars/rabbitmq.yml
rabbitmq_host_group: rabbitmq
HAProxy In
/etc/openstack_deploy/user_variables.ymldefine extra service for MariaDB:haproxy_extra_services: - haproxy_service_name: galera_neutron haproxy_backend_nodes: "{{ (groups['neutron_galera'] | default([]))[:1] }}" haproxy_backup_nodes: "{{ (groups['neutron_galera'] | default([]))[1:] }}" haproxy_bind: "{{ [haproxy_bind_internal_lb_vip_address | default(internal_lb_vip_address)] }}" haproxy_port: 3307 haproxy_backend_port: 3306 haproxy_check_port: 9200 haproxy_balance_type: tcp haproxy_stick_table_enabled: False haproxy_timeout_client: 5000s haproxy_timeout_server: 5000s haproxy_backend_options: - "httpchk HEAD / HTTP/1.0\\r\\nUser-agent:\\ osa-haproxy-healthcheck" haproxy_backend_server_options: - "send-proxy-v2" haproxy_allowlist_networks: "{{ haproxy_galera_allowlist_networks }}" haproxy_service_enabled: "{{ groups['neutron_galera'] is defined and groups['neutron_galera'] | length > 0 }}" haproxy_galera_service_overrides: haproxy_backend_nodes: "{{ groups['galera'][:1] }}" haproxy_backup_nodes: "{{ groups['galera'][1:] }}"
Prepare new infra hosts and create containers on them. For that, run the command:
# openstack-ansible playbooks/setup-hosts.yml --limit neutron-mq_hosts,neutron-database_hosts,neutron_rabbitmq,neutron_galera
Deploy clusters:
MariaDB:
openstack-ansible playbooks/galera-install.yml --limit neutron_galeraRabbitMQ:
openstack-ansible playbooks/rabbitmq-install.yml --limit neutron_rabbitmq
Migrating the service to use new clusters
While it’s relatively easy to start using the new RabbitMQ cluster for the service, migration of the database is slightly tricky and will include some downtime.
First, we need to tell Neutron that from now on, the MySQL database for the
service is listening on a different port. So you should add the following
override to your user_variables.yml:
neutron_galera_port: 3307
Now let’s prepare the destination database: create the database itself along with required users and provide them permissions to interact with the database. For that, we will run the neutron role with a common-db tag and limit execution to the neutron_server group only. You can use the following command for that:
# openstack-ansible playbooks/os-neutron-install.yml --limit neutron_server --tags common-db
Once we have a database prepared, we need to disable HAProxy backends that proxy traffic to the API of the service in order to prevent any user or service actions with it.
For that, we use a small custom playbook. Let’s name it haproxy_backends.yml:
- hosts: haproxy_all
  tasks:
    - name: Manage backends
      community.general.haproxy:
        socket: /run/haproxy.stat
        backend: "{{ backend_group }}-back"
        drain: "{{ haproxy_drain | default(False) }}"
        host: "{{ item }}"
        state: "{{ haproxy_state | default('disabled') }}"
        shutdown_sessions: "{{ haproxy_shutdown_sessions | default(False) | bool }}"
        wait: "{{ haproxy_wait | default(False) | bool }}"
        wait_interval: "{{ haproxy_wait_interval | default(5) }}"
        wait_retries: "{{ haproxy_wait_retries | default(24) }}"
      with_items: "{{ groups[backend_group] }}"
We run it as follows:
# openstack-ansible haproxy_backends.yml -e backend_group=neutron_server
No, we can stop the API service for Neutron:
# ansible -m service -a "state=stopped name=neutron-server" neutron_server
And run a backup/restore of the MySQL database for the service. For this
purpose, we will use another small playbook, that we name as
mysql_backup_restore.yml with the following content:
- hosts: "{{ groups['galera'][0] }}"
  vars:
    _db: "{{ neutron_galera_database | default('neutron') }}"
  tasks:
    - name: Dump the db
      shell: "mysqldump --single-transaction {{ _db }} > /tmp/{{ _db }}"
    - name: Fetch the backup
      fetch:
        src: "/tmp/{{ _db }}"
        dest: "/tmp/db-backup/"
        flat: yes
- hosts: "{{ groups['neutron_galera'][0] }}"
  vars:
    _db: "{{ neutron_galera_database | default('neutron') }}"
  tasks:
    - name: Copy backups to destination
      copy:
        src: "/tmp/db-backup/"
        dest: "/tmp/db-backup/"
    - name: Restore the DB backup
      shell: "mysql {{ _db }} < /tmp/db-backup/{{ _db }}"
Now let’s run the playbook we’ve just created:
# openstack-ansible mysql_backup_restore.yml
Note
The playbook above is not idempotent as it will override database content on the destination hosts.
Once the database content is in place, we can now re-configure the service using the playbook.
It will not only tell Neutron to use the new database but also will switch it to using the new RabbitMQ cluster as well and re-enable the service in HAProxy.
For that to happen we should run the following command:
# openstack-ansible playbooks/os-neutron-install.yml --tags neutron-config,common-mq
After the playbook has finished, neutron services will be started and configured to use new clusters.
Option 2: Dedicated hardware for clusters
This option will describe how to move current MariaDB and RabbitMQ clusters to standalone nodes. This approach can be used to offload control-planes and provide dedicated resources for clusters.

While it’s quite straightforward to establish the architecture above from the very beginning of the deployment, flawless migration of the existing deployment to such a setup is more tricky, as you need to migrate running clusters to the new hardware. Since we will be performing moves one-by-one, to preserve at least two active cluster members, the steps below should be repeated for the other two members.
Migrating MariaDB to the new hardware
The first thing to do is to list current members of the MariaDB cluster. For that, you can issue the following ad-hoc command:
# cd /opt/openstack-ansible/
# ansible -m debug -a "var=groups['galera']" localhost
localhost | SUCCESS => {

   "groups['galera']": [
        "control01_galera_container-68e1fc47",
        "control02_galera_container-59576533",
        "control03_galera_container-f7d1b72b"
   ]
}
Unless overridden, the first host in the group is considered as a “bootstrap” one. This bootstrap host should be migrated last to avoid unnecessary failovers, so it is recommended to start the migration of hosts to the new hardware from the last one to the first one in the output.
Once we’ve figured out the execution order, it’s time for a step-by-step guide.
Remove the last container in the group using the following playbook:
# openstack-ansible playbooks/lxc-containers-destroy.yml --limit control03_galera_container-f7d1b72b
Clean up the removed container from the inventory:
# ./scripts/inventory-manage.py -r control03_galera_container-f7d1b72b
Re-configure openstack_user_config to create a new container.
Assuming, you currently have a config like the one below in your
openstack_user_config.yml:
_control_hosts: &control_hosts
  control01:
    ip: 172.29.236.11
  control02:
    ip: 172.29.236.12
  control03:
    ip: 172.29.236.13

shared-infra_hosts: *control_hosts
Convert it to something like this:
_control_hosts: &control_hosts
  control01:
    ip: 172.29.236.11
  control02:
    ip: 172.29.236.12
  control03:
    ip: 172.29.236.13

memcaching_hosts: *control_hosts
mq_hosts: *control_hosts
operator_hosts: *control_hosts

database_hosts:
  control01:
    ip: 172.29.236.11
  control02:
    ip: 172.29.236.12
  infra03:
    ip: 172.29.236.23
In the example above we de-couple each service that is part of the shared-infra_hosts and define them separately, along with providing MariaDB its new destination host.
Create the container on the new infra node:
# openstack-ansible playbooks/lxc-containers-create.yml --limit infra03,galera
Note
new infra hosts should be prepared before this step (i.e., by running
setup-hosts.ymlplaybook against them).Install MariaDB to this new container and add it to the cluster:
# openstack-ansible playbooks/galera-install.yml
Once the playbook is finished, you can ensure that the cluster is in the Synced state and has proper cluster_size with the following ad-hoc:
# ansible -m command -a "mysql -e \"SHOW STATUS WHERE Variable_name IN ('wsrep_local_state_comment', 'wsrep_cluster_size', 'wsrep_incoming_addresses')\"" neutron_galera
If the cluster is healthy, repeat steps 1-6 for the rest instances, including the “bootstrap” one.
Migrating RabbitMQ to the new hardware
The process of RabbitMQ migration will be pretty much the same as MariaDB with one exception – we need to preserve the same IP addresses for containers when moving them to the new hardware. Otherwise, we would need to re-configure all services (like cinder, nova, neutron, etc.) that rely on RabbitMQ as well, as contrary to MariaDB which is balanced through HAProxy, it’s a client who decides to which RabbitMQ backend it will connect.
Thus, we also don’t care about the order of migration.
Since we need to preserve an IP address, let’s collect this data before taking any actions against the current setup:
# ./scripts/inventory-manage.py -l | grep rabbitmq
| control01_rabbit_mq_container-a3a802ac  | None     | rabbitmq   | control01          | None           | 172.29.239.49  | None                 |
| control02_rabbit_mq_container-51f6cf7c  | None     | rabbitmq   | control02          | None           | 172.29.236.82  | None                 |
| control03_rabbit_mq_container-b30645d9  | None     | rabbitmq   | control03          | None           | 172.29.238.23  | None                 |
Before dropping the RabbitMQ container, it’s worth transitioning the RabbitMQ instance to the Maintenance mode, so it could offload its responsibilities to other cluster members and close connections to clients properly. You can use the following ad-hoc for that:
root@deploy:/opt/openstack-ansible# ansible -m command -a "rabbitmq-upgrade drain" control01_rabbit_mq_container-a3a802ac

control01_rabbit_mq_container-a3a802ac | CHANGED | rc=0 >>
Will put node rabbit@control01-rabbit-mq-container-a3a802ac into maintenance mode. The node will no longer serve any client traffic!
Now we can proceed with container removal:
# openstack-ansible playbooks/lxc-containers-destroy.yml --limit control01_rabbit_mq_container-a3a802ac
And remove it from the inventory:
# ./scripts/inventory-manage.py -r control01_rabbit_mq_container-a3a802ac
Now you need to re-configure openstack_user_config similar to how it was done
for MariaDB. The resulting record at this stage for RabbitMQ should look like
this:
mq_hosts:
  infra01:
    ip: 172.29.236.21
  control02:
    ip: 172.29.236.12
  control03:
    ip: 172.29.236.13
Note
Ensure that you don’t have more generic shared-infra_hosts defined.
Now we need to manually re-generate the inventory and ensure that a new record was mapped to our infra01:
# ./inventory/dynamic_inventory.py

...

# ./scripts/inventory-manage.py -l | grep rabbitmq

| control02_rabbit_mq_container-51f6cf7c  | None     | rabbitmq   | control02          | None           | 172.29.236.82  | None                 |
| control03_rabbit_mq_container-b30645d9  | None     | rabbitmq   | control03          | None           | 172.29.238.23  | None                 |
| infra01_rabbit_mq_container-10ec4732  | None     | rabbitmq   | infra01          | None           | 172.29.238.248 | None                 |
As you might see from the output above, a record for the new container has been generated and assigned correctly to the infra01 host. Though this container has a new IP address, we need to preserve it. So we manually replaced the new IP with the old one in the inventory file and ensured it’s the proper one now:
# sed -i 's/172.29.238.248/172.29.239.49/g' /etc/openstack_deploy/openstack_inventory.json
#./scripts/inventory-manage.py -l | grep rabbitmq
| control02_rabbit_mq_container-51f6cf7c  | None     | rabbitmq   | control02          | None           | 172.29.236.82  | None                 |
| control03_rabbit_mq_container-b30645d9  | None     | rabbitmq   | control03          | None           | 172.29.238.23  | None                 |
| infra01_rabbit_mq_container-10ec4732  | None     | rabbitmq   | infra01          | None           | 172.29.239.49 | None                 |
Now you can proceed with container creation:
# openstack-ansible playbooks/lxc-containers-create.yml --limit infra01,rabbitmq
And install RabbitMQ to the new container and ensure it’s part of the cluster:
# openstack-ansible playbooks/rabbitmq-install.yml
Once the cluster is re-established, it’s worth to clean-up cluster status with regards to the old container name still being considered as “Disk Node”, since the container name has changed:
# ansible -m command -a "rabbitmqctl forget_cluster_node rabbit@control01-rabbit-mq-container-a3a802ac" rabbitmq[0]
Note
You can take the cluster node name to remove from the output at step two.
Repeat the steps above for the rest of the instances.
Option 3: Growing Clusters Horizontally
This option is by far the least popular despite being very straightforward, as it has a pretty narrowed use case when it makes sense to scale this way.
Though, to preserve quorum you should always have an odd number of cluster members or be prepared to provide extra configuration if using an even number of members.
Adding new members to the MariaDB Galera cluster
Horizontal scaling of the MariaDB cluster makes sense only when you’re using an L7 balancer which can work properly with Galera clusters (like ProxySQL or MaxScale) instead of default HAProxy and the weak point of the current cluster is read performance rather than writes.
Extending the cluster is quite trivial. For that, you need to:
Add another destination host in
openstack_user_configfor database_hosts:database_hosts: control01: ip: 172.29.236.11 control02: ip: 172.29.236.12 control03: ip: 172.29.236.13 infra01: ip: 172.29.236.21 infra02: ip: 172.29.236.22
Create new containers on the destination host:
# openstack-ansible playbooks/lxc-containers-create.yml --limit infra01,infra02,galera
Deploy MariaDB there and add it to the cluster:
# openstack-ansible playbooks/galera-install.yml
Ensure the cluster is healthy with the following ad-hoc:
# ansible -m command -a "mysql -e \"SHOW STATUS WHERE Variable_name IN ('wsrep_local_state_comment', 'wsrep_cluster_size', 'wsrep_incoming_addresses')\"" neutron_galera
Adding new members to the RabbitMQ cluster
Growing the RabbitMQ cluster vertically makes sense mostly when you don’t have HA queues or Quorum queues enabled.
To add more members to the RabbitMQ cluster execute the following steps:
Add another destination host in
openstack_user_configfor mq_hosts:mq_hosts: control01: ip: 172.29.236.11 control02: ip: 172.29.236.12 control03: ip: 172.29.236.13 infra01: ip: 172.29.236.21 infra02: ip: 172.29.236.22
Create new containers on the destination host:
# openstack-ansible playbooks/lxc-containers-create.yml --limit infra01,infra02,rabbitmq
Deploy RabbitMQ on the new host and enroll it to the cluster:
# openstack-ansible playbooks/rabbitmq-install.yml
Once a new RabbitMQ container is deployed, you need to make all services aware of its existence by re-configuring them. For that, you can either run individual service playbooks, like this:
# openstack-ansible playbooks/os-<service>-install.yml –tags <service>-config
Where <service> is a service name, like neutron, nova, cinder, etc. Another way around would be to fire up setup-openstack.yml but it will take quite some time to execute.
Conclusion
As you might see, OpenStack-Ansible is flexible enough to let you scale a deployment in many different ways.
But which one is right for you? Well, it all depends on the situation you find yourself in.
In case your deployment has grown to a point where RabbitMQ/MariaDB clusters can’t simply deal with the load these clusters create regardless of the hardware beneath them – you should use option one (Option 1: Independent clusters per service) and make independent clusters per service.
This option can be also recommended to improve deployment resilience – in case of cluster failure this will affect just one service rather than each and everyone in a common deployment use case. Another quite popular variation of this option can be having just standalone MariaDB/RabbitMQ instances per service, without any clusterization. The benefit of such a setup is very fast recovery, especially when talking about RabbitMQ.
In case you are the owner of quite modest hardware specs for controllers, you might pay more attention to option two (Option 1: Independent clusters per service). This way you can offload your controllers by moving heavy applications, like MariaDB/RabbitMQ, to some other hardware that can also have relatively modest specs.
Option three (Option 3: Growing Clusters Horizontally) can be used if your deployment meets the requirements that were written above (ie. not using HA queues or using ProxySQL for balancing) and usually should be considered when you’ve outgrown option one as well.
