(DEPRECATED) Basic Deployment (UI)
Note
The tripleo-ui is no longer available as of Stein. This documentation is deprecated.
This document will show you how to access the TripleO UI and perform a simple deployment with some customizations. Validations are automatically run at every step to help uncover potential issues early.
Prepare Your Environment
The UI is installed by default with the undercloud. You can confirm
this by opening undercloud.conf and checking for:
enable_ui = true
enable_validations = true
The validations are optional but strongly recommended.
Make sure you have your environment ready and undercloud running:
Make sure the images are uploaded in Glance on the undercloud:
Access the UI
The UI is accessible on the undercloud URL. With the default settings the URLs may look like the following, depending on whether the undercloud was set up with SSL:
http://192.168.24.1:3000 if it was not
https://192.168.24.2 if set up with SSL
The username is admin and the password can be obtained by running
the following command on the undercloud:
$ sudo hiera keystone::admin_password
Note
On an undercloud deployed without SSL, the UI and API endpoints are deployed on the control plane which may not be routable. In this case you will need to create a tunnel or use a tool such as sshuttle to be able to use the UI from a local browser:
sshuttle -r user@undercloud 192.168.24.0/24
Virtual
If you cannot directly access the undercloud (for example because the undercloud is installed in a VM on a remote lab host), you will need to create a tunnel and make some configuration changes in order to access the UI locally.
Open the tunnel from the virt host, to the undercloud:
ssh -Nf user@undercloud -L 0.0.0.0:443:192.168.24.2:443 # If SSL
ssh -Nf user@undercloud -L 0.0.0.0:3000:192.168.24.1:3000 # If no SSL
Note
Quickstart started creating the tunnel automatically during Pike. If using an older version you will have to create the tunnel manually, for example:
ssh -F /root/.quickstart/ssh.config.ansible undercloud -L 0.0.0.0:443:192.168.24.2:443
Edit the UI config on the undercloud to replace the undercloud IP with your virt host name, for example:
sudo sed -i.bak s/192.168.24.2/virthost/ /var/www/openstack-tripleo-ui/dist/tripleo_ui_config.js
Additionally, make sure all the API endpoints are commented out in this file.
Note
Changes to
tripleo_ui_config.jsare overwritten on undercloud upgrades.You may have to open port 3000 or 443 on your virt host.
Stable Branch
Newton
Starting in Ocata, all the API ports are proxied through 3000 (non-SSL) or 443 (SSL). If using Newton, you will need to ensure ports for all the API endpoints specified in
tripleo_ui_config.jsare open and accessible. If using SSL with self-signed certificates, Firefox will also require a SSL certificate exception to be accepted for every port.The UI should now be accessible at http://virthost:3000 or https://virthost.
Manage Plans
A default plan named overcloud is created during the undercloud
installation, based on the default tripleo-heat-templates installed on
the system. This plan can be customized and deployed.
It is also possible to create and manage additional plans in parallel, in order to test different configurations.
By clicking on “Manage Deployments” beside the deployment name, you can perform actions on plans such as create, export, delete, etc.
Note
There can be confusion with node assignments when switching between plans, particularly in previous releases like Newton. If doing work with multiple plans, ensure the Node counts are what you expect before starting the deployment, for example by navigating to Edit Configuration -> Parameters.
Manage Nodes
Register Nodes
Navigate to the Nodes tab in the top bar and click on the Register Nodes button. New nodes can be added in two ways:
Importing an instackenv.json file
Importing an instackenv.json file
Manually defining nodes via the Add New button.
Introspect Nodes
Introspection is a required step when deploying from the UI. Once the
nodes are registered and in the manageable provision state, select
the nodes and click on the Introspect Nodes button.
Provide Nodes
Once introspection is completed, nodes need to be “provided” in order
to move to the available state and be available for
deployments. Select the nodes and click on the Provide Nodes button.
Note
For more information about node states, see Node States.
Tag Nodes
Nodes need to be tagged to match a specific profile/role before they can be used in a deployment. Select the nodes you want to assign a profile to, then click on Tag Nodes (the option may be in a dropdown menu).
Stable Branch
In Newton and Ocata, node assignment and node tagging are done at the same time when assigning nodes on the Deployment Plan page.
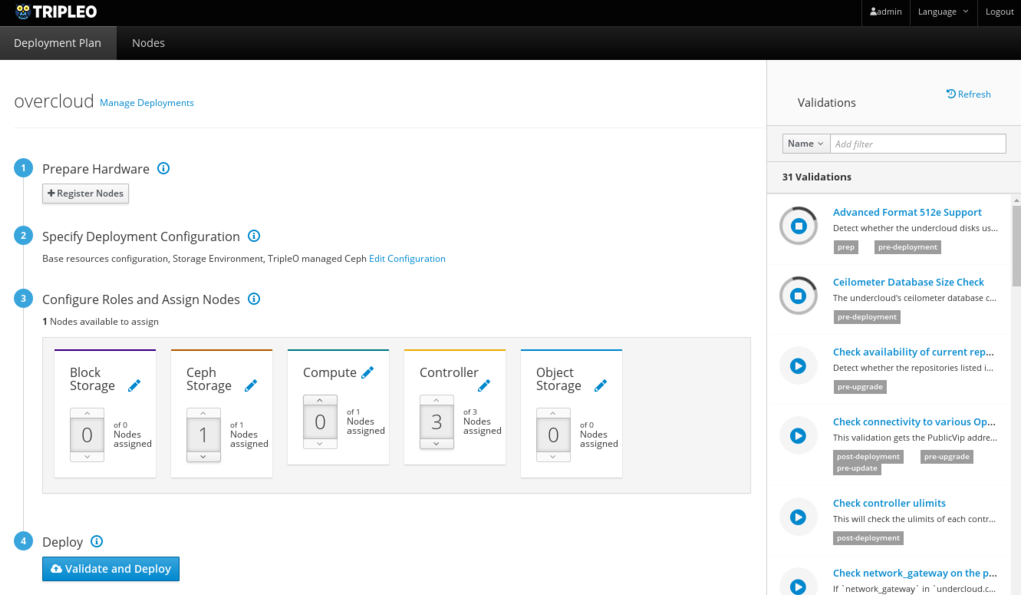
Configure the Deployment
On the Deployment Plan tab, you can configure both the overall deployment, as well as specific roles.
Clicking on the Edit Configuration link displays the list of environments available and their description, based on the templates provided in the plan. After enabling environments as desired, click on Save Changes and navigate to the Parameters tab. Once saved, the enabled environments will also be configurable on this tab.
The Parameters tab lets you set configuration options for the deployment in general, as well as for each individual environment.
Stable Branch
Newton
In Newton it was not possible to configure individual environments. The environment templates should be updated directly with the required parameters before uploading a new plan.
Individual roles can also be configured by clicking on the Pencil icon beside the role name on each card.
Stable Branch
Newton
In Newton, you may need to assign at least one node to the role before the related configuration options are loaded.
Assign Nodes
The second number on each card indicates the number of nodes tagged with this particular profile. The number of nodes manually assigned via the number picker will be deployed.
Stable Branch
In Newton and Ocata, nodes are tagged as part of assigning a node to a profile. This can cause issues when switching deployment plans, as the node counts displayed on the card may not match the value actually stored in the plan. You can correct this by clicking on Edit Configuration -> Parameters and checking/updating the node counts for ControllerCount, ComputeCount, etc.
Additionally, when using custom roles you should make sure to unassign the nodes associated with these roles before deleting the plan, as the role cards are displayed based on the roles in the current plan only. Therefore it is not possible to unassign a node which is associated with a role that does not exist in the current plan.
Deploy the Overcloud
Click on the Deploy button.
You may see a warning if not all validations passed. While this is expected in resources-constrained virtual environments, it is recommended to check the failed validations carefully before proceeding.
The View detailed information link shows the details for all the
Heat resources being deployed.
Post-Deployment
Once the deployment completes, the progress bar will be replaced with information about the overcloud such as the IP address and login credentials.
If the deployment failed, information about the failure will be displayed.
Virtual
To access the overcloud, you will need to update your tunnel in order to access the new URL. For example, if your overcloud information is as such:
Overcloud IP address: 192.168.24.12
Username: admin
Password: zzzzzz
Assuming you deployed the overcloud with SSL enabled, you could create the following tunnel from your virt host to the undercloud:
ssh -Nf user@undercloud -L 0.0.0.0:1234:192.168.24.12:443
After opening port 1234 on your virt host, you should be able to access the overcloud by navigating to https://virthost:1234.
