ETSI NFV-SOL VNF Deployment as VM with LCM Operation User Data
This document describes how to deploy VNF as VM with LCM operation user data in Tacker v1 API using CLI commands. Please check LCM-user-data spec and NFV-SOL014 v2.8.1 for more information on LCM operation user data.
Note
This is a document for Tacker v1 API. See ETSI NFV-SOL VNF Deployment as VM with LCM Operation User Data for Tacker v2 API.
Note
Most of the content is the same as ETSI NFV-SOL VNF Deployment as VM with TOSCA, but some have ‘LCM operation user data’ specific descriptions. The part will be clarified with the notation [This is UserData specific part].
Overview
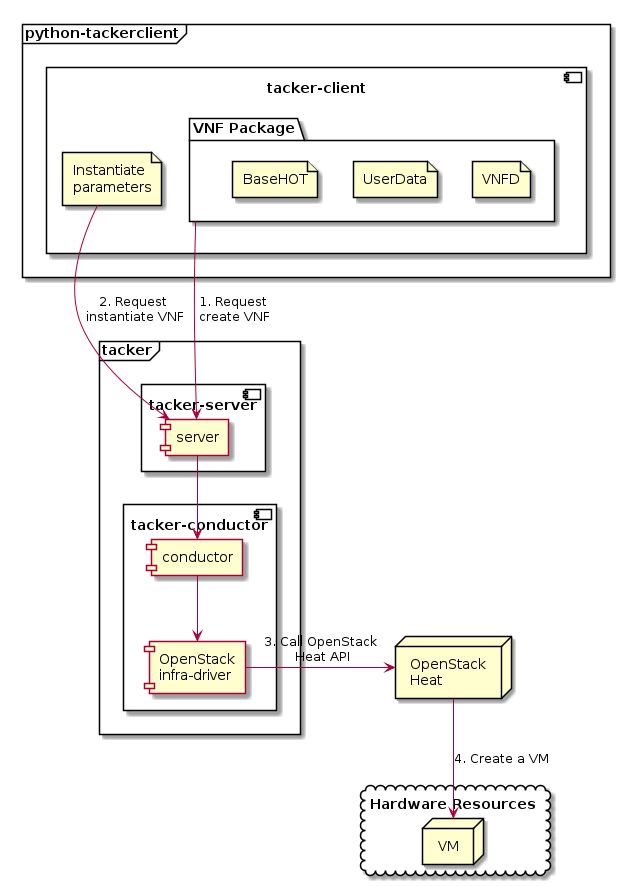
The diagram below shows an overview of the VNF deployment.
Request create VNF
A user requests tacker-server to create a VNF with tacker-client by uploading a VNF Package and requesting
create VNF. The VNF Package should containBaseHOTandUserDatain addition toVNFD. The detailed explanation of these contents can be found in VNF Package.Request instantiate VNF
A user requests tacker-server to instantiate the created VNF by requesting
instantiate VNFwith instantiate parameters.Call OpenStack Heat API
Upon receiving a request, tacker-server redirects it to tacker-conductor. In tacker-conductor, the request is redirected again to an appropriate infra-driver (in this case OpenStack infra-driver) according to the contents of the instantiate parameters. Then, OpenStack infra-driver calls OpenStack Heat APIs to create a VM as a VNF.
Create a VM
OpenStack Heat creates a VM according to the API calls.
Prerequisites
The following packages should be installed:
tacker
python-tackerclient
A default VIM should be registered according to VIM Management.
The VNF Package(sample_vnf_package_csar.zip) used below is prepared by referring to VNF Package.
Note
[This is UserData specific part] In order to deploy VNF using LCM operation user data, it is necessary to include BaseHOT and UserData in the VNF Package, which are optional in VNF Package.
VNF Deployment Procedure as VM
In order to deploy VNF as a VM, it is necessary to execute the following procedure. Details of CLI commands are described in VNF Package Management and VNF Lifecycle Management with v1 Tacker.
Many procedures are the same as ETSI NFV-SOL VNF Deployment as VM with TOSCA, so refer to the doc for those procedures.
1. Create VNF Package Info
See procedure in ETSI NFV-SOL VNF Deployment as VM with TOSCA.
2. Upload VNF Package
See procedure in ETSI NFV-SOL VNF Deployment as VM with TOSCA.
3. Create VNF Identifier
See procedure in ETSI NFV-SOL VNF Deployment as VM with TOSCA.
4. Instantiate VNF
Create a sample_param_file.json file with the following format. This is the file that defines the parameters for an instantiate request. These parameters will be set in the body of the instantiate request.
Required parameter:
flavourId
additionalParams
Note
Details of flavourId is described in VNF Descriptor (VNFD) based on ETSI NFV-SOL001.
Note
[This is UserData specific part] additionalParams is a parameter that can be described by KeyValuePairs. By setting the following two parameters in this parameter, instantiate using LCM operation user data becomes possible. For file_name.py and class_name, set the file name and class name described in Prerequisites.
lcm-operation-user-data: ./UserData/file_name.py
lcm-operation-user-data-class: class_name
Optional parameters:
instantiationLevelId
extVirtualLinks
extManagedVirtualLinks
vimConnectionInfo
Note
You can skip vimConnectionInfo only when you have
the default VIM described in VIM Management.
Note
This operation can specify the vimConnectionInfo
for the VNF instance.
Even if this operation specify multiple vimConnectionInfo
associated with one VNF instance, only one of them will be used for
life cycle management operations.
An example of a param file with only required parameters:
{
  "flavourId":"simple",
  "additionalParams": {
    "lcm-operation-user-data": "./UserData/lcm_user_data.py",
    "lcm-operation-user-data-class": "SampleUserData"
  }
}
An example of a param file with optional parameters:
{
  "flavourId": "simple",
  "instantiationLevelId": "instantiation_level_1",
  "extVirtualLinks": [
    {
      "id": "net0",
      "resourceId": "4bf3e646-7a24-4f04-a985-d8f4bb1203de", #Set the uuid of the network to use
      "extCps": [
        {
          "cpdId": "CP1",
          "cpConfig": [
            {
              "cpProtocolData": [
                {
                  "layerProtocol": "IP_OVER_ETHERNET",
                  "ipOverEthernet": {
                    "ipAddresses": [
                      {
                        "type": "IPV4",
                        "fixedAddresses": [
                          "10.10.0.49"  #Set the ip address from subnet range
                        ],
                        "subnetId": "06709e3e-33ff-4221-9d07-565c3fd55223" #Set the subnetID of net0
                      }
                    ]
                  }
                }
              ]
            }
          ]
        }
      ]
    }
  ],
  "vimConnectionInfo": [
    {
      "id": "e24f9796-a8e9-4cb0-85ce-5920dcddafa1",    #Set a random uuid.
      "vimId": "8a0fd79d-e224-4c27-85f5-ee79c6e0d870", #Set the uuid of the VIM to use
      "vimType": "ETSINFV.OPENSTACK_KEYSTONE.V_2"
    }
  ],
  "additionalParams": {
    "lcm-operation-user-data": "./UserData/lcm_user_data.py",
    "lcm-operation-user-data-class": "SampleUserData"
  }
}
samlple_param_file.json used in this document is below.
{
  "flavourId": "simple",
  "extVirtualLinks": [
    {
      "id": "net0",
      "resourceId": "${network_uuid}",
      "extCps": [
        {
          "cpdId": "CP1",
          "cpConfig": [
            {
              "cpProtocolData": [
                {
                  "layerProtocol": "IP_OVER_ETHERNET",
                  "ipOverEthernet": {
                    "ipAddresses": [
                      {
                        "type": "IPV4",
                        "numDynamicAddresses": 1,
                        "subnetId": "${subnet_uuid}"
                      }
                    ]
                  }
                }
              ]
            }
          ]
        }
      ]
    }
  ],
  "vimConnectionInfo": [
    {
      "id": "e24f9796-a8e9-4cb0-85ce-5920dcddafa1",
      "vimId": "${vim_uuid}",
      "vimType": "ETSINFV.OPENSTACK_KEYSTONE.V_2"
    }
  ],
  "additionalParams": {
    "lcm-operation-user-data": "./UserData/lcm_user_data.py",
    "lcm-operation-user-data-class": "SampleUserData"
  }
}
Execute the following CLI command to instantiate the VNF instance.
$ openstack vnflcm instantiate VNF_INSTANCE_ID ./sample_param_file.json
Result:
Instantiate request for VNF Instance 810d8c9b-e467-4b06-9265-ac9dce015fce has been accepted.
After that, execute the following CLI command and confirm that VNF instance instantiation was successful.
Confirm that the ‘Instantiation State’ is ‘INSTANTIATED’.
$ openstack vnflcm show VNF_INSTANCE_ID -c 'Instantiation State'
Result:
+---------------------+--------------+
| Field               | Value        |
+---------------------+--------------+
| Instantiation State | INSTANTIATED |
+---------------------+--------------+
5. Terminate VNF
See procedure in ETSI NFV-SOL VNF Deployment as VM with TOSCA.
6. Delete VNF Identifier
See procedure in ETSI NFV-SOL VNF Deployment as VM with TOSCA.
