Using DevStack with neutron Networking
This guide will walk you through using OpenStack neutron with the ML2 plugin and the Open vSwitch mechanism driver.
Using Neutron with a Single Interface
In some instances, like on a developer laptop, there is only one network interface that is available. In this scenario, the physical interface is added to the Open vSwitch bridge, and the IP address of the laptop is migrated onto the bridge interface. That way, the physical interface can be used to transmit self service project network traffic, the OpenStack API traffic, and management traffic.
Warning
When using a single interface networking setup, there will be a temporary network outage as your IP address is moved from the physical NIC of your machine, to the OVS bridge. If you are SSH’d into the machine from another computer, there is a risk of being disconnected from your ssh session (due to arp cache invalidation), which would stop the stack.sh or leave it in an unfinished state. In these cases, start stack.sh inside its own screen session so it can continue to run.
Physical Network Setup
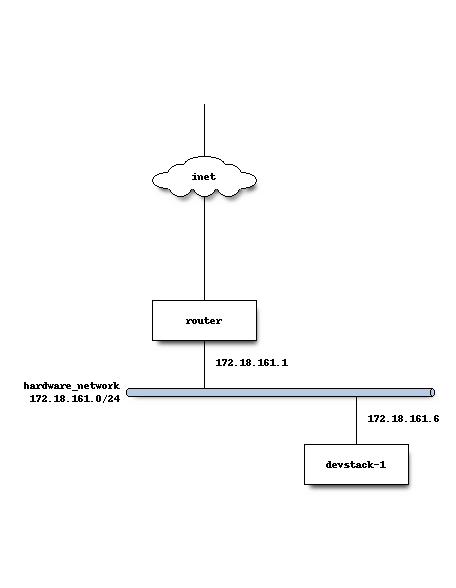
In most cases where DevStack is being deployed with a single interface, there is a hardware router that is being used for external connectivity and DHCP. The developer machine is connected to this network and is on a shared subnet with other machines. The local.conf exhibited here assumes that 1500 is a reasonable MTU to use on that network.
DevStack Configuration
The following is a complete local.conf for the host named devstack-1. It will run all the API and services, as well as serving as a hypervisor for guest instances.
[[local|localrc]]
HOST_IP=172.18.161.6
SERVICE_HOST=172.18.161.6
MYSQL_HOST=172.18.161.6
RABBIT_HOST=172.18.161.6
GLANCE_HOSTPORT=172.18.161.6:9292
ADMIN_PASSWORD=secret
DATABASE_PASSWORD=secret
RABBIT_PASSWORD=secret
SERVICE_PASSWORD=secret

## Neutron options
Q_USE_SECGROUP=True
FLOATING_RANGE="172.18.161.0/24"
IPV4_ADDRS_SAFE_TO_USE="10.0.0.0/22"
Q_FLOATING_ALLOCATION_POOL=start=172.18.161.250,end=172.18.161.254
PUBLIC_NETWORK_GATEWAY="172.18.161.1"
PUBLIC_INTERFACE=eth0

# Open vSwitch provider networking configuration
Q_USE_PROVIDERNET_FOR_PUBLIC=True
OVS_PHYSICAL_BRIDGE=br-ex
PUBLIC_BRIDGE=br-ex
OVS_BRIDGE_MAPPINGS=public:br-ex
Adding Additional Compute Nodes
Let’s suppose that after installing DevStack on the first host, you also want to do multinode testing and networking.
Physical Network Setup
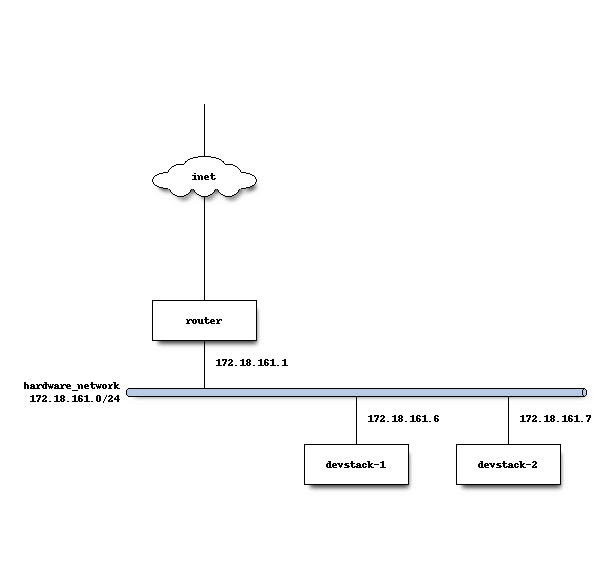
After DevStack installs and configures Neutron, traffic from guest VMs flows out of devstack-2 (the compute node) and is encapsulated in a VXLAN tunnel back to devstack-1 (the control node) where the L3 agent is running.
stack@devstack-2:~/devstack$ sudo ovs-vsctl show
8992d965-0ba0-42fd-90e9-20ecc528bc29
    Bridge br-int
        fail_mode: secure
        Port br-int
            Interface br-int
                type: internal
        Port patch-tun
            Interface patch-tun
                type: patch
                options: {peer=patch-int}
    Bridge br-tun
        fail_mode: secure
        Port "vxlan-c0a801f6"
            Interface "vxlan-c0a801f6"
                type: vxlan
                options: {df_default="true", in_key=flow, local_ip="172.18.161.7", out_key=flow, remote_ip="172.18.161.6"}
        Port patch-int
            Interface patch-int
                type: patch
                options: {peer=patch-tun}
        Port br-tun
            Interface br-tun
                type: internal
    ovs_version: "2.0.2"
Open vSwitch on the control node, where the L3 agent runs, is configured to de-encapsulate traffic from compute nodes, then forward it over the br-ex bridge, where eth0 is attached.
stack@devstack-1:~/devstack$ sudo ovs-vsctl show
422adeea-48d1-4a1f-98b1-8e7239077964
    Bridge br-tun
        fail_mode: secure
        Port br-tun
            Interface br-tun
                type: internal
        Port patch-int
            Interface patch-int
                type: patch
                options: {peer=patch-tun}
        Port "vxlan-c0a801d8"
            Interface "vxlan-c0a801d8"
                type: vxlan
                options: {df_default="true", in_key=flow, local_ip="172.18.161.6", out_key=flow, remote_ip="172.18.161.7"}
    Bridge br-ex
        Port phy-br-ex
            Interface phy-br-ex
                type: patch
                options: {peer=int-br-ex}
        Port "eth0"
            Interface "eth0"
        Port br-ex
            Interface br-ex
                type: internal
    Bridge br-int
        fail_mode: secure
        Port "tapce66332d-ea"
            tag: 1
            Interface "tapce66332d-ea"
                type: internal
        Port "qg-65e5a4b9-15"
            tag: 2
            Interface "qg-65e5a4b9-15"
                type: internal
        Port "qr-33e5e471-88"
            tag: 1
            Interface "qr-33e5e471-88"
                type: internal
        Port "qr-acbe9951-70"
            tag: 1
            Interface "qr-acbe9951-70"
                type: internal
        Port br-int
            Interface br-int
                type: internal
        Port patch-tun
            Interface patch-tun
                type: patch
                options: {peer=patch-int}
        Port int-br-ex
            Interface int-br-ex
                type: patch
                options: {peer=phy-br-ex}
    ovs_version: "2.0.2"
br-int is a bridge that the Open vSwitch mechanism driver creates, which is used as the “integration bridge” where ports are created, and plugged into the virtual switching fabric. br-ex is an OVS bridge that is used to connect physical ports (like eth0), so that floating IP traffic for project networks can be received from the physical network infrastructure (and the internet), and routed to self service project network ports. br-tun is a tunnel bridge that is used to connect OpenStack nodes (like devstack-2) together. This bridge is used so that project network traffic, using the VXLAN tunneling protocol, flows between each compute node where project instances run.
DevStack Compute Configuration
The host devstack-2 has a very minimal local.conf.
[[local|localrc]]
HOST_IP=172.18.161.7
SERVICE_HOST=172.18.161.6
MYSQL_HOST=172.18.161.6
RABBIT_HOST=172.18.161.6
GLANCE_HOSTPORT=172.18.161.6:9292
ADMIN_PASSWORD=secret
MYSQL_PASSWORD=secret
RABBIT_PASSWORD=secret
SERVICE_PASSWORD=secret

## Neutron options
PUBLIC_INTERFACE=eth0
ENABLED_SERVICES=n-cpu,rabbit,q-agt,placement-client
Network traffic from eth0 on the compute nodes is then NAT’d by the controller node that runs Neutron’s neutron-l3-agent and provides L3 connectivity.
Neutron Networking with Open vSwitch and Provider Networks
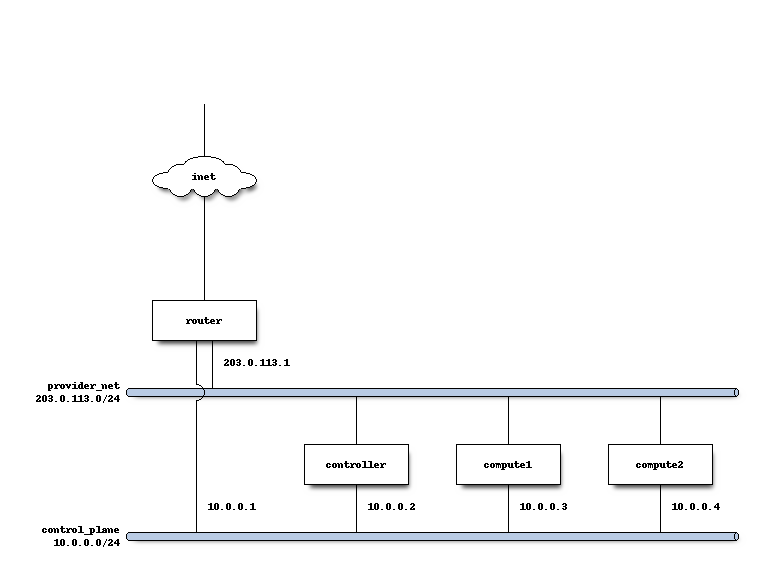
In some instances, it is desirable to use neutron’s provider networking extension, so that networks that are configured on an external router can be utilized by neutron, and instances created via Nova can attach to the network managed by the external router.
For example, in some lab environments, a hardware router has been pre-configured by another party, and an OpenStack developer has been given a VLAN tag and IP address range, so that instances created via DevStack will use the external router for L3 connectivity, as opposed to the neutron L3 service.
Physical Network Setup
On a compute node, the first interface, eth0 is used for the OpenStack management (API, message bus, etc) as well as for ssh for an administrator to access the machine.
stack@compute:~$ ifconfig eth0
eth0      Link encap:Ethernet  HWaddr bc:16:65:20:af:fc
          inet addr:10.0.0.3
eth1 is manually configured at boot to not have an IP address. Consult your operating system documentation for the appropriate technique. For Ubuntu, the contents of /etc/network/interfaces contains:
auto eth1
iface eth1 inet manual
        up ifconfig $IFACE 0.0.0.0 up
        down ifconfig $IFACE 0.0.0.0 down
The second physical interface, eth1 is added to a bridge (in this case named br-ex), which is used to forward network traffic from guest VMs.
stack@compute:~$ sudo ovs-vsctl add-br br-ex
stack@compute:~$ sudo ovs-vsctl add-port br-ex eth1
stack@compute:~$ sudo ovs-vsctl show
9a25c837-32ab-45f6-b9f2-1dd888abcf0f
    Bridge br-ex
        Port br-ex
            Interface br-ex
                type: internal
        Port phy-br-ex
            Interface phy-br-ex
                type: patch
                options: {peer=int-br-ex}
        Port "eth1"
            Interface "eth1"
Service Configuration
Control Node
In this example, the control node will run the majority of the OpenStack API and management services (keystone, glance, nova, neutron)
Compute Nodes
In this example, the nodes that will host guest instances will run
the neutron-openvswitch-agent for network connectivity, as well as
the compute service nova-compute.
DevStack Configuration
The following is a snippet of the DevStack configuration on the controller node.
HOST_IP=10.0.0.2
SERVICE_HOST=10.0.0.2
MYSQL_HOST=10.0.0.2
RABBIT_HOST=10.0.0.2
GLANCE_HOSTPORT=10.0.0.2:9292
PUBLIC_INTERFACE=eth1

ADMIN_PASSWORD=secret
MYSQL_PASSWORD=secret
RABBIT_PASSWORD=secret
SERVICE_PASSWORD=secret

## Neutron options
Q_USE_SECGROUP=True
ENABLE_TENANT_VLANS=True
TENANT_VLAN_RANGE=3001:4000
PHYSICAL_NETWORK=default
OVS_PHYSICAL_BRIDGE=br-ex

Q_USE_PROVIDER_NETWORKING=True

disable_service q-l3

## Neutron Networking options used to create Neutron Subnets

IPV4_ADDRS_SAFE_TO_USE="203.0.113.0/24"
NETWORK_GATEWAY=203.0.113.1
PROVIDER_SUBNET_NAME="provider_net"
PROVIDER_NETWORK_TYPE="vlan"
SEGMENTATION_ID=2010
USE_SUBNETPOOL=False
In this configuration we are defining IPV4_ADDRS_SAFE_TO_USE to be a publicly routed IPv4 subnet. In this specific instance we are using the special TEST-NET-3 subnet defined in RFC 5737, which is used for documentation. In your DevStack setup, IPV4_ADDRS_SAFE_TO_USE would be a public IP address range that you or your organization has allocated to you, so that you could access your instances from the public internet.
The following is the DevStack configuration on compute node 1.
HOST_IP=10.0.0.3
SERVICE_HOST=10.0.0.2
MYSQL_HOST=10.0.0.2
RABBIT_HOST=10.0.0.2
GLANCE_HOSTPORT=10.0.0.2:9292
ADMIN_PASSWORD=secret
MYSQL_PASSWORD=secret
RABBIT_PASSWORD=secret
SERVICE_PASSWORD=secret

# Services that a compute node runs
ENABLED_SERVICES=n-cpu,rabbit,q-agt

## Open vSwitch provider networking options
PHYSICAL_NETWORK=default
OVS_PHYSICAL_BRIDGE=br-ex
PUBLIC_INTERFACE=eth1
Q_USE_PROVIDER_NETWORKING=True
Compute node 2’s configuration will be exactly the same, except
HOST_IP will be 10.0.0.4
When DevStack is configured to use provider networking (via
Q_USE_PROVIDER_NETWORKING is True) -
DevStack will automatically add the network interface defined in
PUBLIC_INTERFACE to the OVS_PHYSICAL_BRIDGE
For example, with the above configuration, a bridge is
created, named br-ex which is managed by Open vSwitch, and the
second interface on the compute node, eth1 is attached to the
bridge, to forward traffic sent by guest VMs.
Miscellaneous Tips
Non-Standard MTU on the Physical Network
Neutron by default uses a MTU of 1500 bytes, which is the standard MTU for Ethernet.
A different MTU can be specified by adding the following to the Neutron section of local.conf. For example, if you have network equipment that supports jumbo frames, you could set the MTU to 9000 bytes by adding the following
[[post-config|/$Q_PLUGIN_CONF_FILE]]
global_physnet_mtu = 9000
Disabling Next Generation Firewall Tools
DevStack does not properly operate with modern firewall tools. Specifically it will appear as if the guest VM can access the external network via ICMP, but UDP and TCP packets will not be delivered to the guest VM. The root cause of the issue is that both ufw (Uncomplicated Firewall) and firewalld (Fedora’s firewall manager) apply firewall rules to all interfaces in the system, rather then per-device. One solution to this problem is to revert to iptables functionality.
To get a functional firewall configuration for Fedora do the following:
sudo service iptables save
sudo systemctl disable firewalld
sudo systemctl enable iptables
sudo systemctl stop firewalld
sudo systemctl start iptables
To get a functional firewall configuration for distributions containing ufw, disable ufw. Note ufw is generally not enabled by default in Ubuntu. To disable ufw if it was enabled, do the following:
sudo service iptables save
sudo ufw disable
Configuring Extension Drivers for the ML2 Plugin
Extension drivers for the ML2 plugin are set with the variable
Q_ML2_PLUGIN_EXT_DRIVERS, and includes the ‘port_security’ extension
by default. If you want to remove all the extension drivers (even
‘port_security’), set Q_ML2_PLUGIN_EXT_DRIVERS to blank.
Using Linux Bridge instead of Open vSwitch
The configuration for using the Linux Bridge ML2 driver is fairly straight forward. The Linux Bridge configuration for DevStack is similar to the Open vSwitch based single interface setup, with small modifications for the interface mappings.
[[local|localrc]]
HOST_IP=172.18.161.6
SERVICE_HOST=172.18.161.6
MYSQL_HOST=172.18.161.6
RABBIT_HOST=172.18.161.6
GLANCE_HOSTPORT=172.18.161.6:9292
ADMIN_PASSWORD=secret
DATABASE_PASSWORD=secret
RABBIT_PASSWORD=secret
SERVICE_PASSWORD=secret

## Neutron options
Q_USE_SECGROUP=True
FLOATING_RANGE="172.18.161.0/24"
IPV4_ADDRS_SAFE_TO_USE="10.0.0.0/24"
Q_FLOATING_ALLOCATION_POOL=start=172.18.161.250,end=172.18.161.254
PUBLIC_NETWORK_GATEWAY="172.18.161.1"
PUBLIC_INTERFACE=eth0

Q_USE_PROVIDERNET_FOR_PUBLIC=True

# Linuxbridge Settings
Q_AGENT=linuxbridge
LB_PHYSICAL_INTERFACE=eth0
PUBLIC_PHYSICAL_NETWORK=default
LB_INTERFACE_MAPPINGS=default:eth0
Using MacVTap instead of Open vSwitch
Security groups are not supported by the MacVTap agent. Due to that, devstack configures the NoopFirewall driver on the compute node.
MacVTap agent does not support l3, dhcp and metadata agent. Due to that you can chose between the following deployment scenarios:
Single node with provider networks using config drive and external l3, dhcp
This scenario applies, if l3 and dhcp services are provided externally, or if you do not require them.
[[local|localrc]]
HOST_IP=10.0.0.2
SERVICE_HOST=10.0.0.2
MYSQL_HOST=10.0.0.2
RABBIT_HOST=10.0.0.2
ADMIN_PASSWORD=secret
MYSQL_PASSWORD=secret
RABBIT_PASSWORD=secret
SERVICE_PASSWORD=secret

Q_ML2_PLUGIN_MECHANISM_DRIVERS=macvtap
Q_USE_PROVIDER_NETWORKING=True

enable_plugin neutron https://opendev.org/openstack/neutron

## MacVTap agent options
Q_AGENT=macvtap
PHYSICAL_NETWORK=default

IPV4_ADDRS_SAFE_TO_USE="203.0.113.0/24"
NETWORK_GATEWAY=203.0.113.1
PROVIDER_SUBNET_NAME="provider_net"
PROVIDER_NETWORK_TYPE="vlan"
SEGMENTATION_ID=2010
USE_SUBNETPOOL=False

[[post-config|/$Q_PLUGIN_CONF_FILE]]
[macvtap]
physical_interface_mappings = $PHYSICAL_NETWORK:eth1

[[post-config|$NOVA_CONF]]
force_config_drive = True
Multi node with MacVTap compute node
This scenario applies, if you require OpenStack provided l3, dhcp or metadata services. Those are hosted on a separate controller and network node, running some other l2 agent technology (in this example Open vSwitch). This node needs to be configured for VLAN tenant networks.
For OVS, a similar configuration like described in the OVS Provider Network section can be used. Just add the following line to this local.conf, which also loads the MacVTap mechanism driver:
[[local|localrc]]
...
Q_ML2_PLUGIN_MECHANISM_DRIVERS=openvswitch,linuxbridge,macvtap
...
For the MacVTap compute node, use this local.conf:
HOST_IP=10.0.0.3
SERVICE_HOST=10.0.0.2
MYSQL_HOST=10.0.0.2
RABBIT_HOST=10.0.0.2
ADMIN_PASSWORD=secret
MYSQL_PASSWORD=secret
RABBIT_PASSWORD=secret
SERVICE_PASSWORD=secret

# Services that a compute node runs
disable_all_services
enable_plugin neutron https://opendev.org/openstack/neutron
ENABLED_SERVICES+=n-cpu,q-agt

## MacVTap agent options
Q_AGENT=macvtap
PHYSICAL_NETWORK=default

[[post-config|/$Q_PLUGIN_CONF_FILE]]
[macvtap]
physical_interface_mappings = $PHYSICAL_NETWORK:eth1
